and the distribution of digital products.
Turn Your Dumb Solar Inverter Into a Smart One With This Home Assistant Hack
\ \ It’s been 2 years since I fell into the Renewable Energy Rabbit Hole and something this has been able to do, is to also spark my interest in IoT devices and hardware. Something I have realized over the years is that it is not only important for you to have a Solar Inverter setup, you also need data from your inverter setup. Now some inverters come with a manageable energy monitoring solution, the best I have seen so far has to be from Victron with their VRM solution. It is without a doubt, the best OEM energy monitoring solution. You can see a demo of it here.
\ I used to use an SRNE inverter and thanks to the good folks at Home Assistant community forum, I was able to make my own data logger for it. However, I switched to the Growatt SPF 6000 ES PLUS a year ago and since, I have been using the OEM energy monitoring solution with their ShineWifi data logger. But it wasn’t sufficient for me as it could only update data every 5-minute interval and it relied on Growatt Cloud service, which is something I wanted to be less dependent on.
\ If you are someone like me who owns the same inverter and you are looking for a way to make it work locally on your Home Assistant network, this tutorial is for you. A basic overview of what we will be doing is taking the data from the Inverter’s Modbus RTU Protocol, sending it over TCP, then decoding the data in our Home Assistant instance so we can see it as entities inside Home Assistant.
Prerequisites- Ethernet cables (trust me, I wasn’t a fan of them)
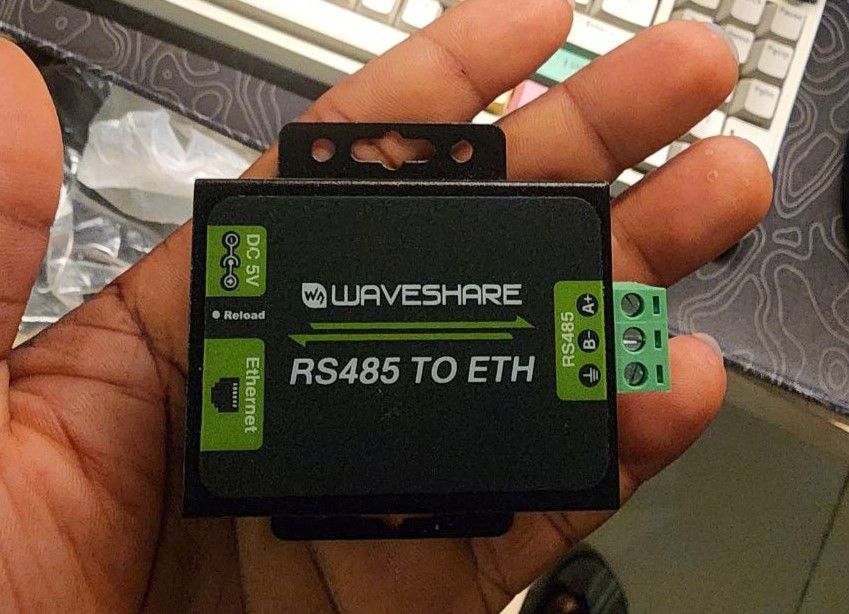
- Waveshare RS485 to ETH adapter (you can get them on Amazon, Aliexpress etc.)
- Home router (it works on your home network without internet)
- OffGrid SPF5000 Modbus RS485&RS232 RTU Protocol Manual
- Home Assistant running on your home network.
The Waveshare device comes with a power adapter too. You plug it into power, and plug it into the side that has the DC 5V port.
Then you take an Ethernet cable, plug one side to your home router or network switch’s LAN port, and plug the other side to the Waveshare device.
After that, you should observe to see if the Ethernet port has the usual still and blinking light to confirm the cable connection was successful.
\
\
Visit the Waveshare Adapter PageWhen you check at the back of your Waveshare device, you would see the Default IP, Username and Password. Mine has 192.168.0.7 as the Default IP, admin as the username and admin as password.
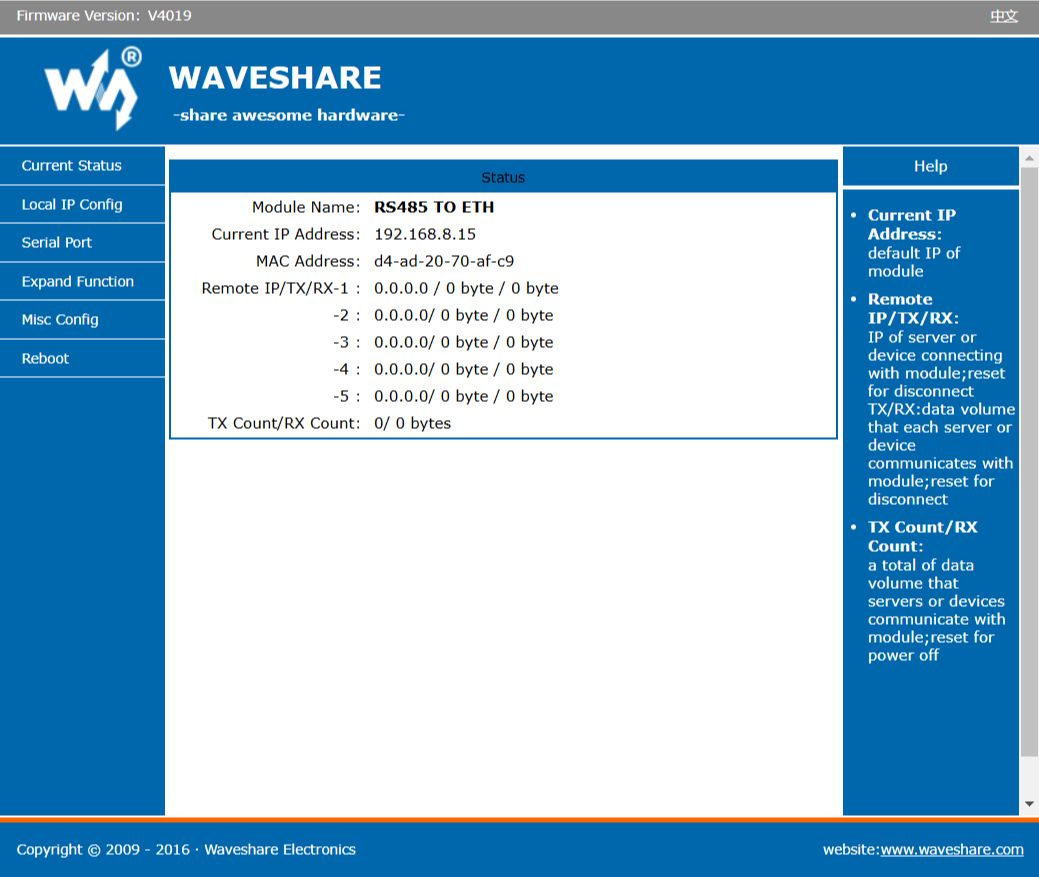
When you visit the default IP, you should see the Waveshare homepage which looks like this.
\
\
- However, if you can’t reach it, which I was unable to at first, it’s most likely because your router IP range is out of reach of the Waveshare device’s default IP. So let's fix that.
\
Temporarily Change Your Computer’s IP to Match the WaveshareFor me, my router’s range is 192.168.8.x, but the Waveshare was 192.168.0.7, so my computer wasn’t able to communicate with it unless I temporarily changed my PC’s IP to match. \
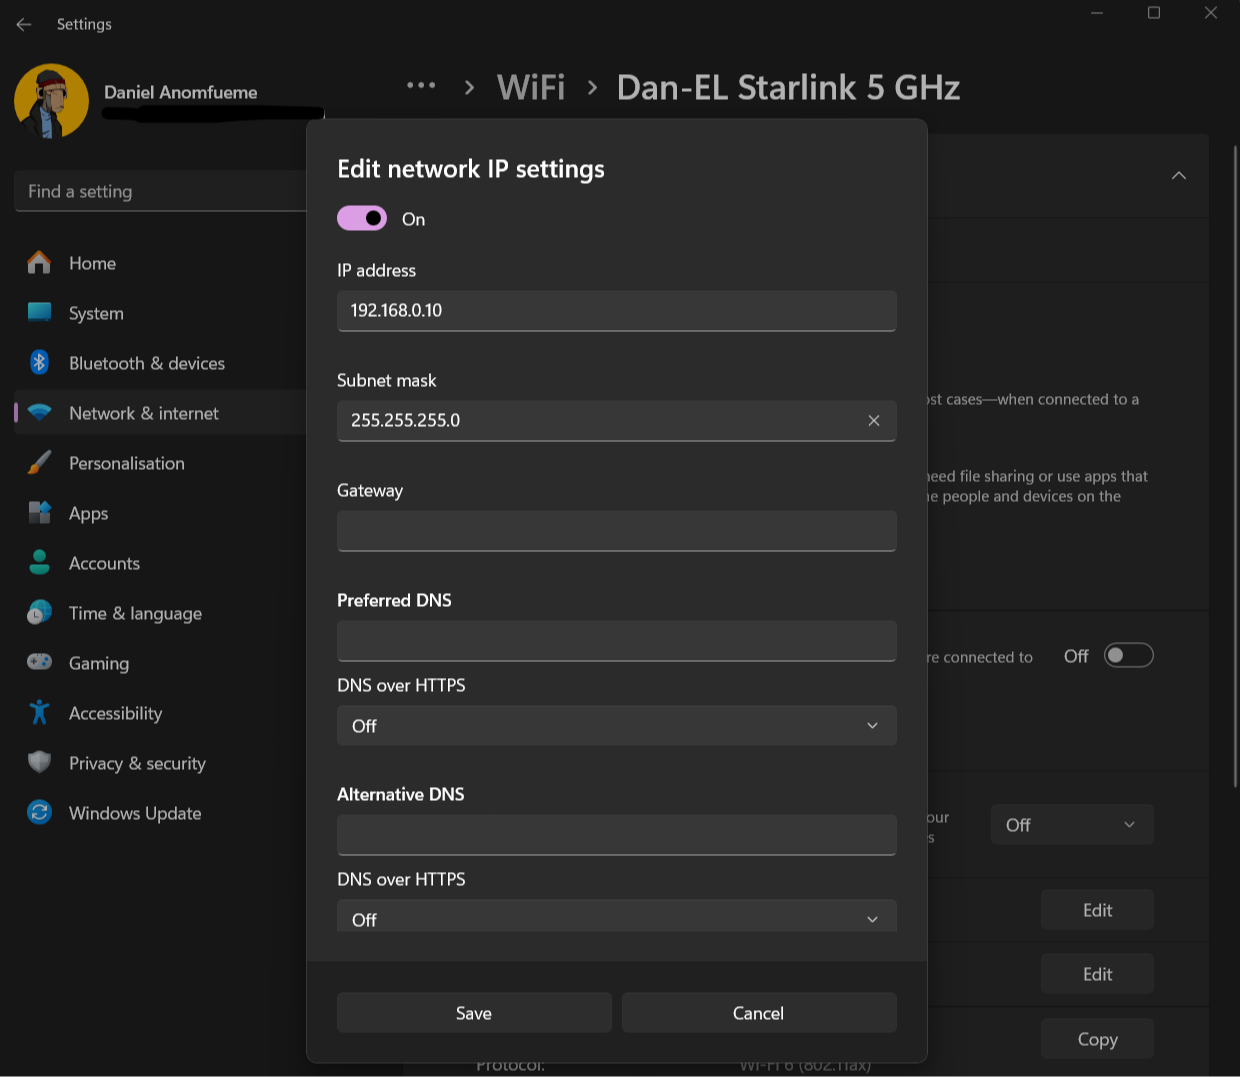
Go to your Network & Internet under settings.
\
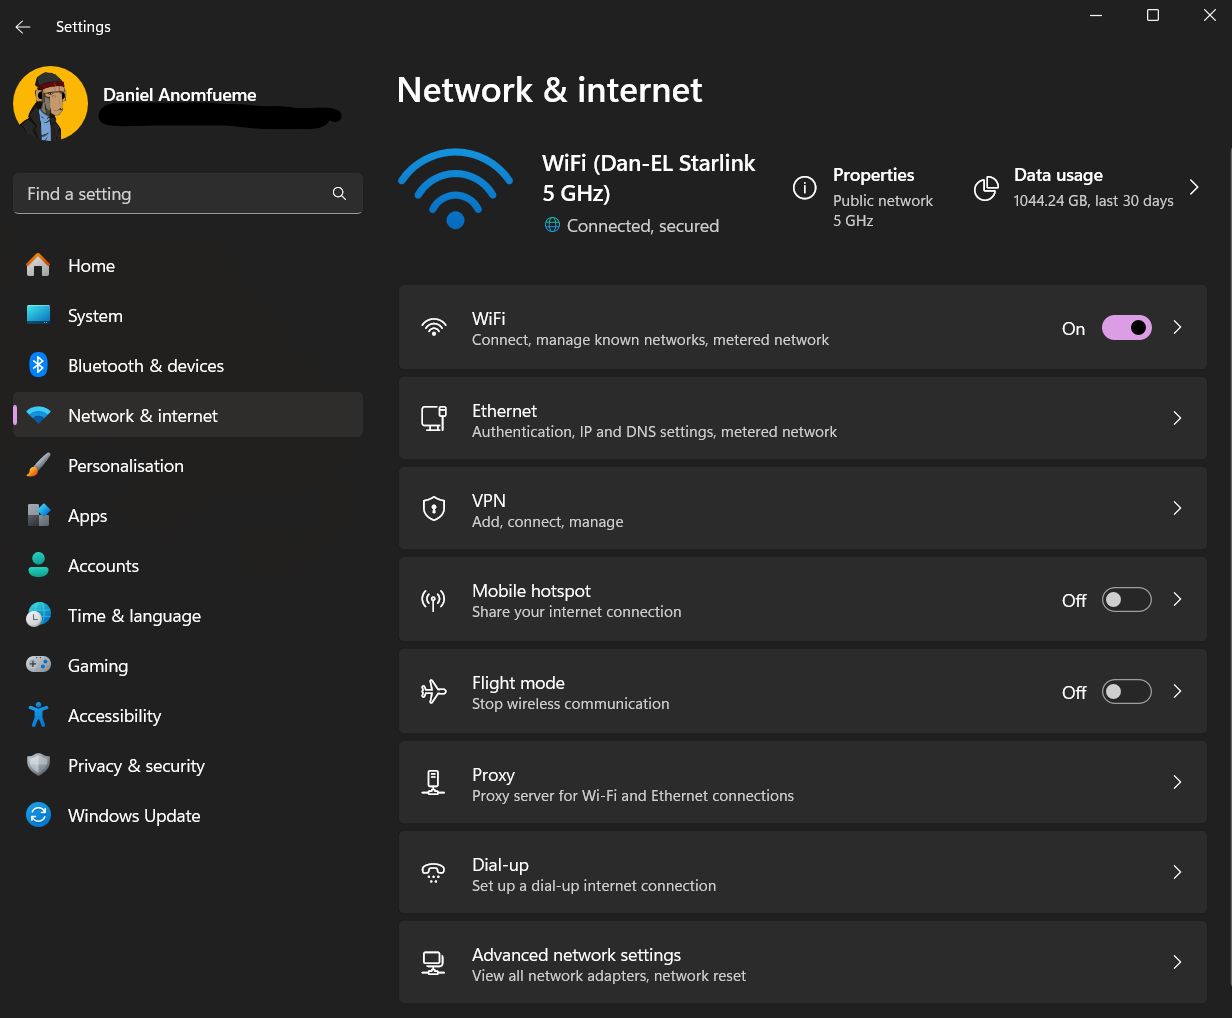
Click on the properties
\
\
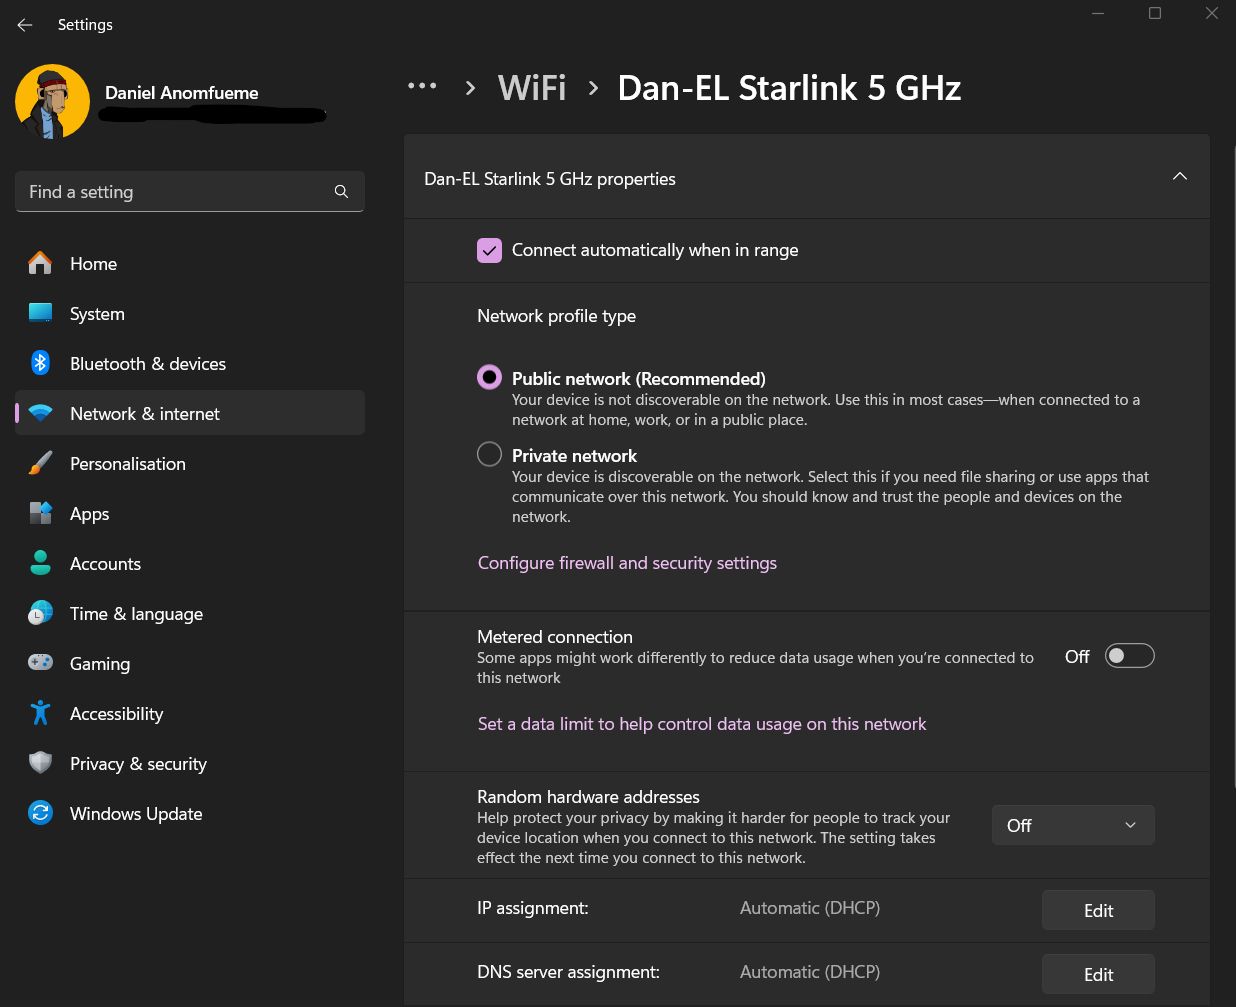
Click on edit IP Assignment and choose Manual
Toggle IPv4 and you would see a drop-down of settings
Set IP Address to 192.168.0.10 (or any other 192.168.0.x, except .7)
Subnet Mask (from router’s LAN settings) to 255.255.255.0
Gateway to 192.168.0.1 (if required, or leave blank)
Then save.
\
- Open a browser and go to the Waveshare default IP, 192.168.0.7
- Login to the web interface using the default login details.
- Go to the Local IP Config tab, set the IP to static and pick an IP available on your router’s IP range. For mine, I picked 192.168.8.15
\
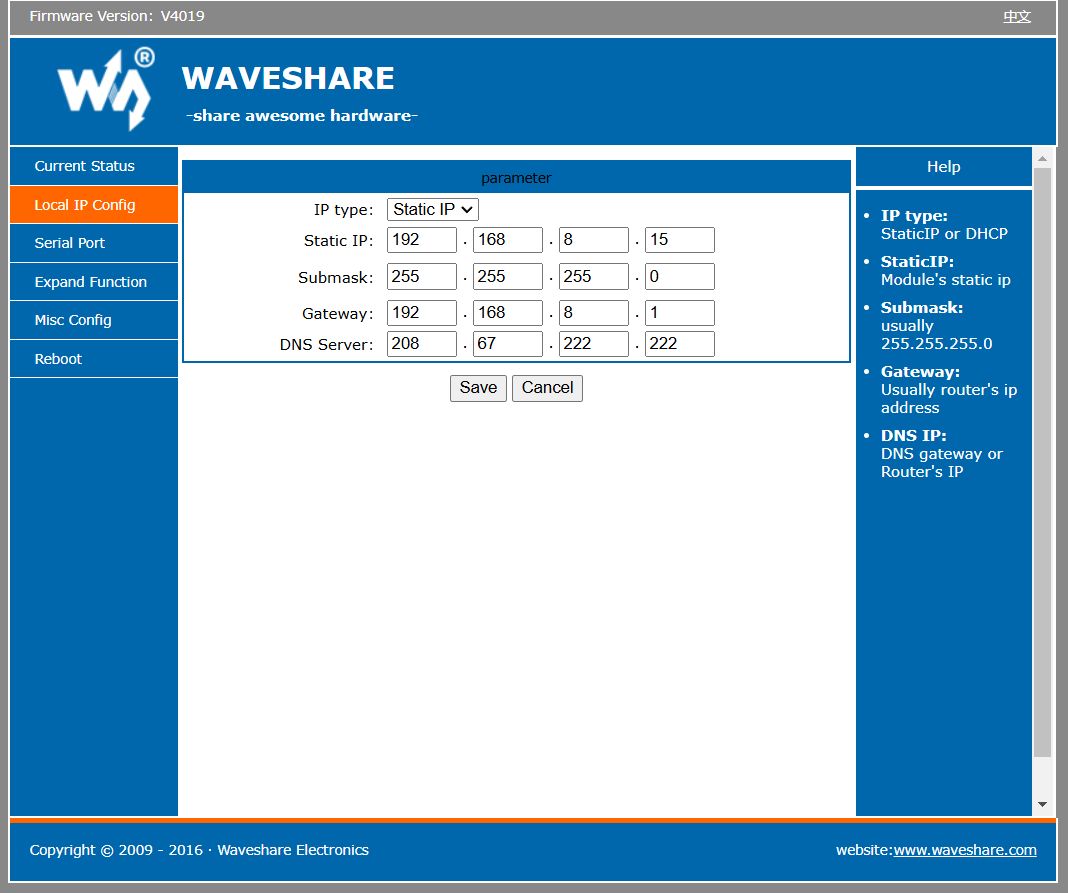
- Apply the changes and reboot the Waveshare device.
- Restore your computer’s IP back to Automatic DHCP.
- Now your Waveshare device should be accessible on your router’s network through the static IP you chose. Ideally, you should reserve that IP you chose for the Waveshare device on your router, through the router’s DHCP settings.
\
Connect your Inverter to the Waveshare DeviceNow we can see the Waveshare device on our network, we are halfway there. Next thing we need to do is to connect the inverter itself to the Waveshare device.
\
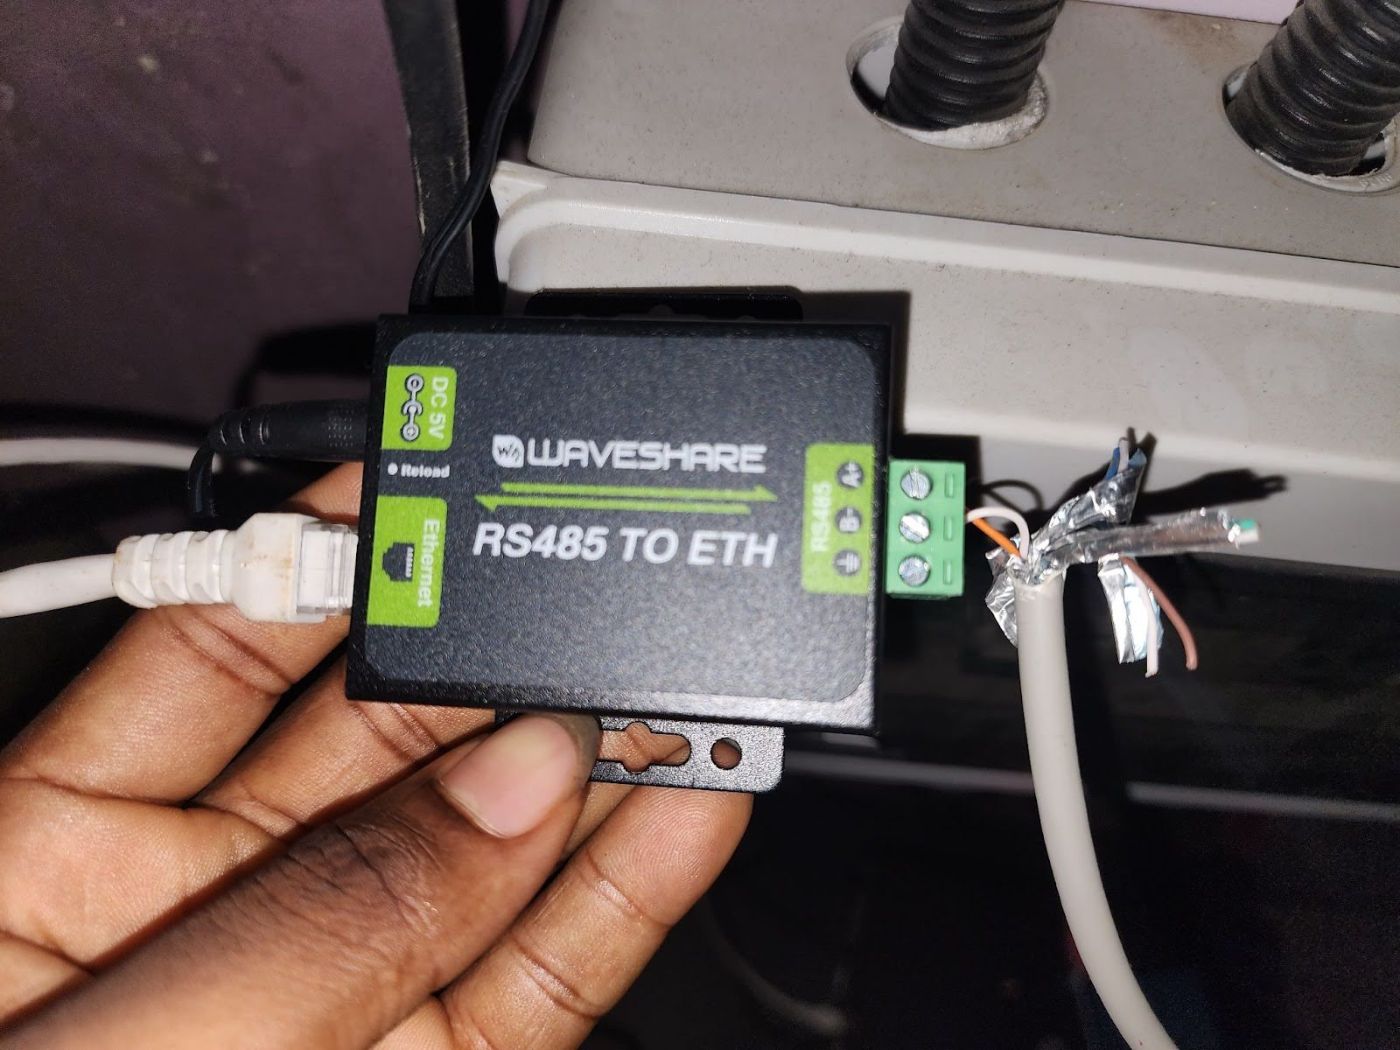
Get another Ethernet cable and connect one end to the Growatt Inverter RS485 port, which is under the inverter.
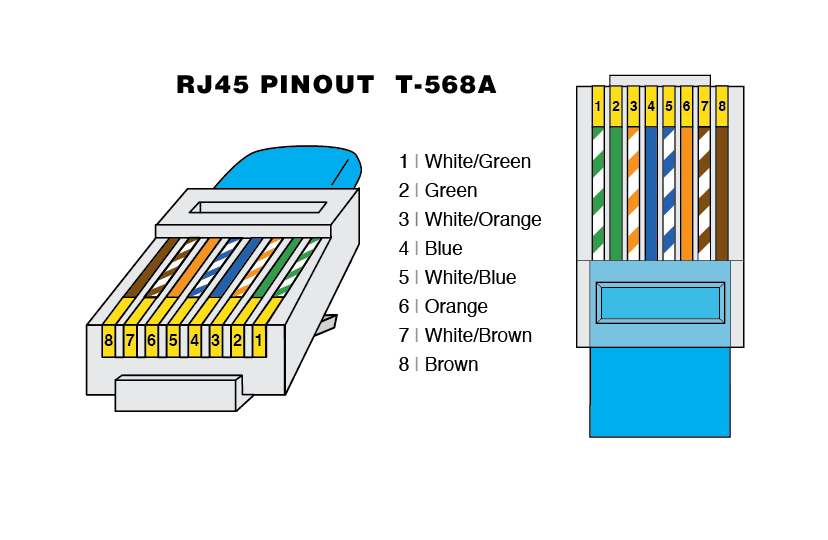
Cut the other end of the Ethernet cable and expose pin 1 (Orange-white) and pin 2 (Orange).
\
Then insert pin 1 into B- and pin 2 into A+ on the Waveshare device.
\
\
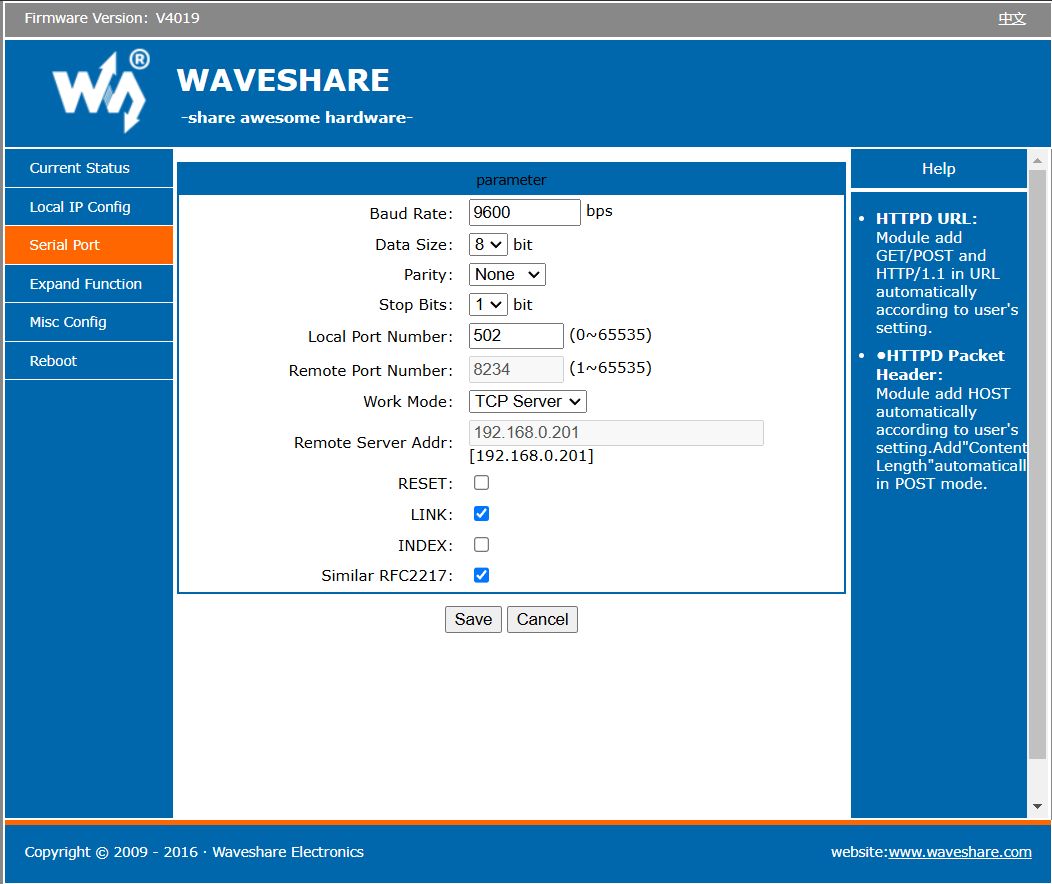
Now we are done with all physical connections, let’s go to the Waveshare IP. Click on the Serial Port tab. Change the Work Mode to TCP Server. Baud Rate to 9600, Data Size to 8, Parity to None, Stop Bits to 1, Local Port Number to 502. Then save and restart.
\
\
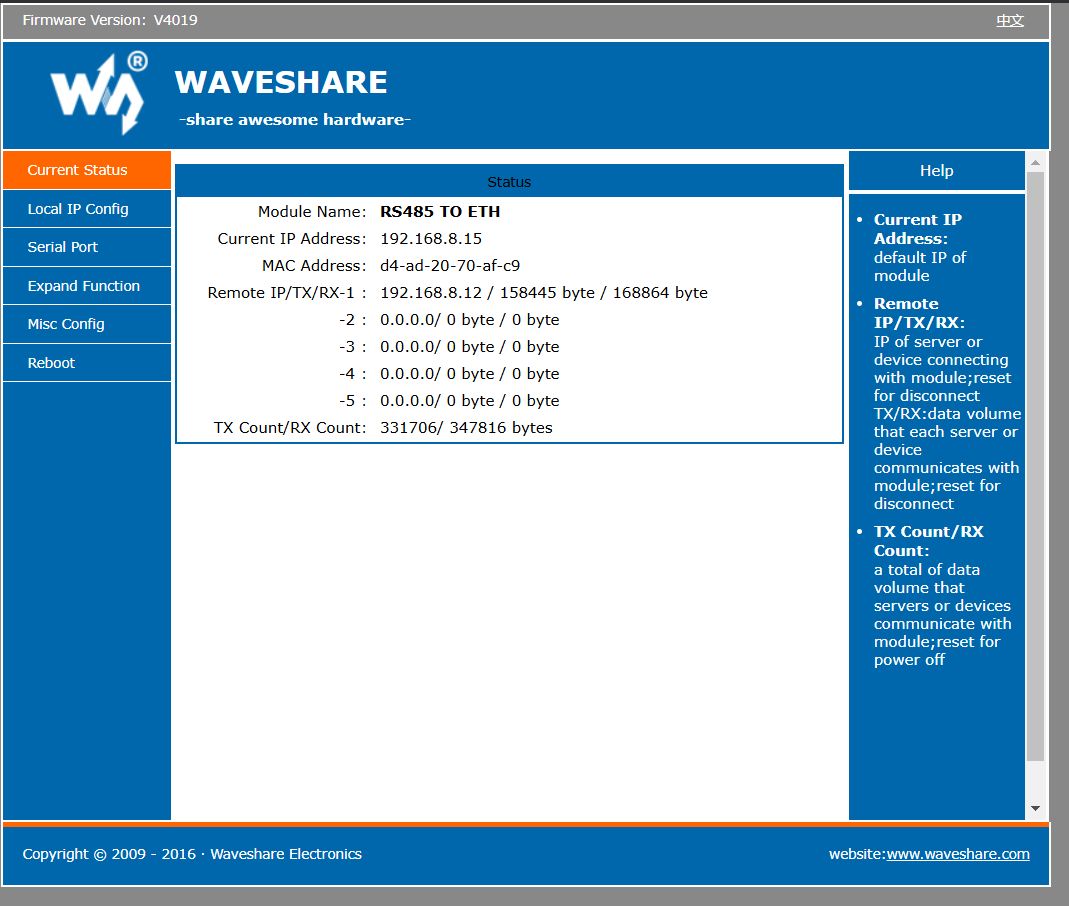
To confirm data is being transferred, look at the Current Status tab and see if the byte figures increase as it refreshes.
\
The Modbus data is currently being sent from the inverter to your home network. What’s left is to have Home Assistant decode that information and have them as entities. Luckily Home Assistant has a Modbus integration built into it and we just need to configure it.
\
- We start by modifying the configuration.yaml file on your Home Assistant network.
- If you are like me, who likes to keep the configuration.yaml as lean as possible by having separate yaml files for things and then including them into the configuration.yaml file, go ahead and create a new file called modbus.yaml and a new file called templates.yaml.
- Include the modbus.yaml into the configuration.yaml by adding the code below.
- Then go to the modbus.yaml and paste this code inside it.
\
- Then go to the templates.yaml and paste this code inside it.
\
- Finally restart your Home Assistant network.
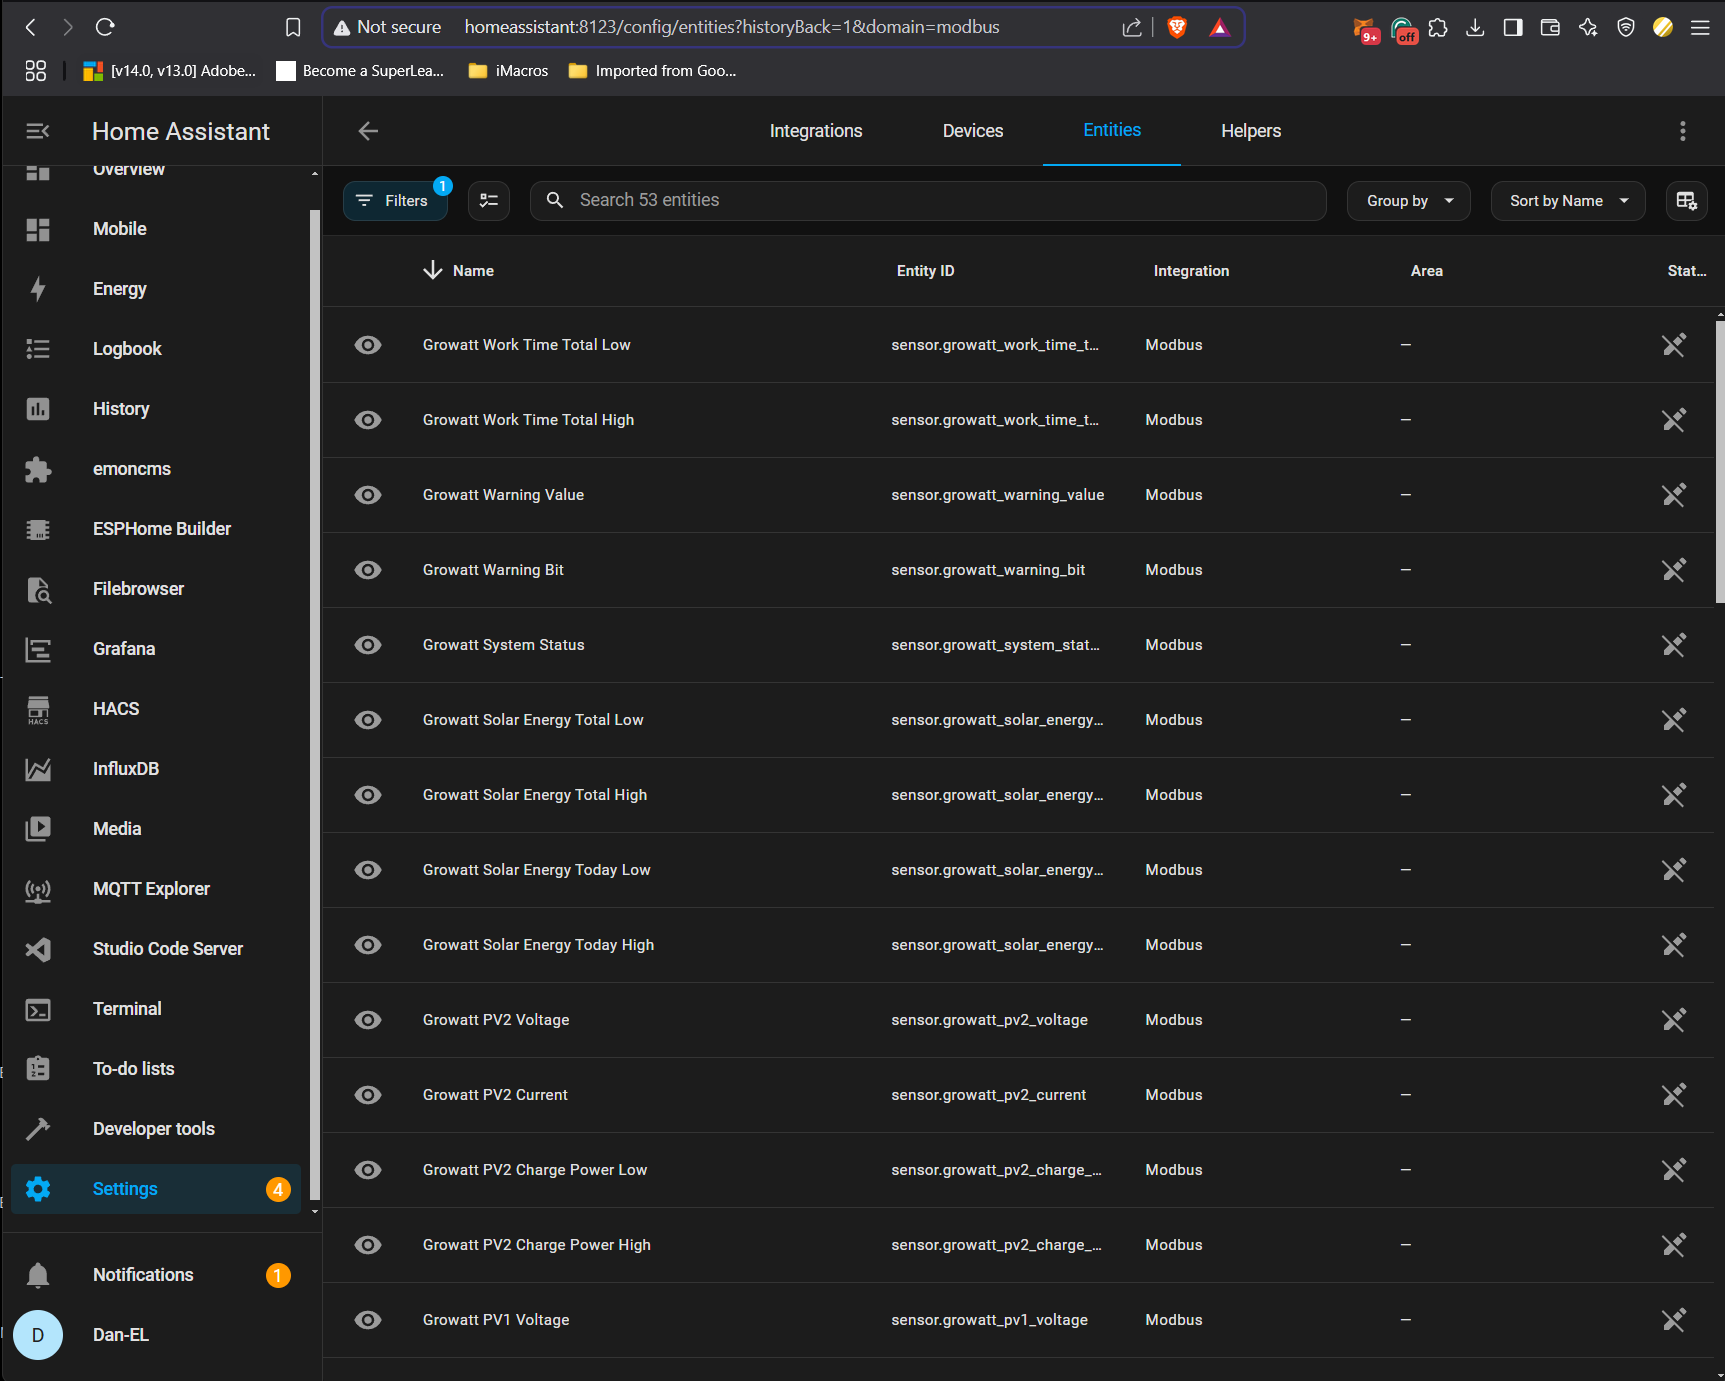
Now the Modbus sensor entities we created should be showing up in Home Assistant. You can confirm by going to the Entities tab in Home Assistant and filtering by Modbus integration or you search “Growatt” there.
\
Also for some context, you would observe in the modbus.yaml file, there are High and Low of some values. Those values are stored as two registers (high and low bytes), so they need to be combined correctly. Since Home Assistant doesn’t support direct bit-shifting in Modbus, we use template sensors in the templates.yaml file to combine the values.
\ Thanks for reading and feel free to share your experience in the comment section.
\ \n