and the distribution of digital products.
Instagram Ads 101: A Step-by-Step Guide to Running Ads That Work

Have you ever wished you could just skip the Instagram algorithm altogether and guarantee your content gets seen by your target audience?
Or, rather than asking folks to click over to your bio to find your products, content, or website, just include a link right in the post?
Well, meet Instagram ads.
They are paid posts on the platform that you can use to promote your business, product, or services and reach new people. Ads appear in the same format as organic posts across Instagram Stories, Reels, Explore, and in-feed posts.
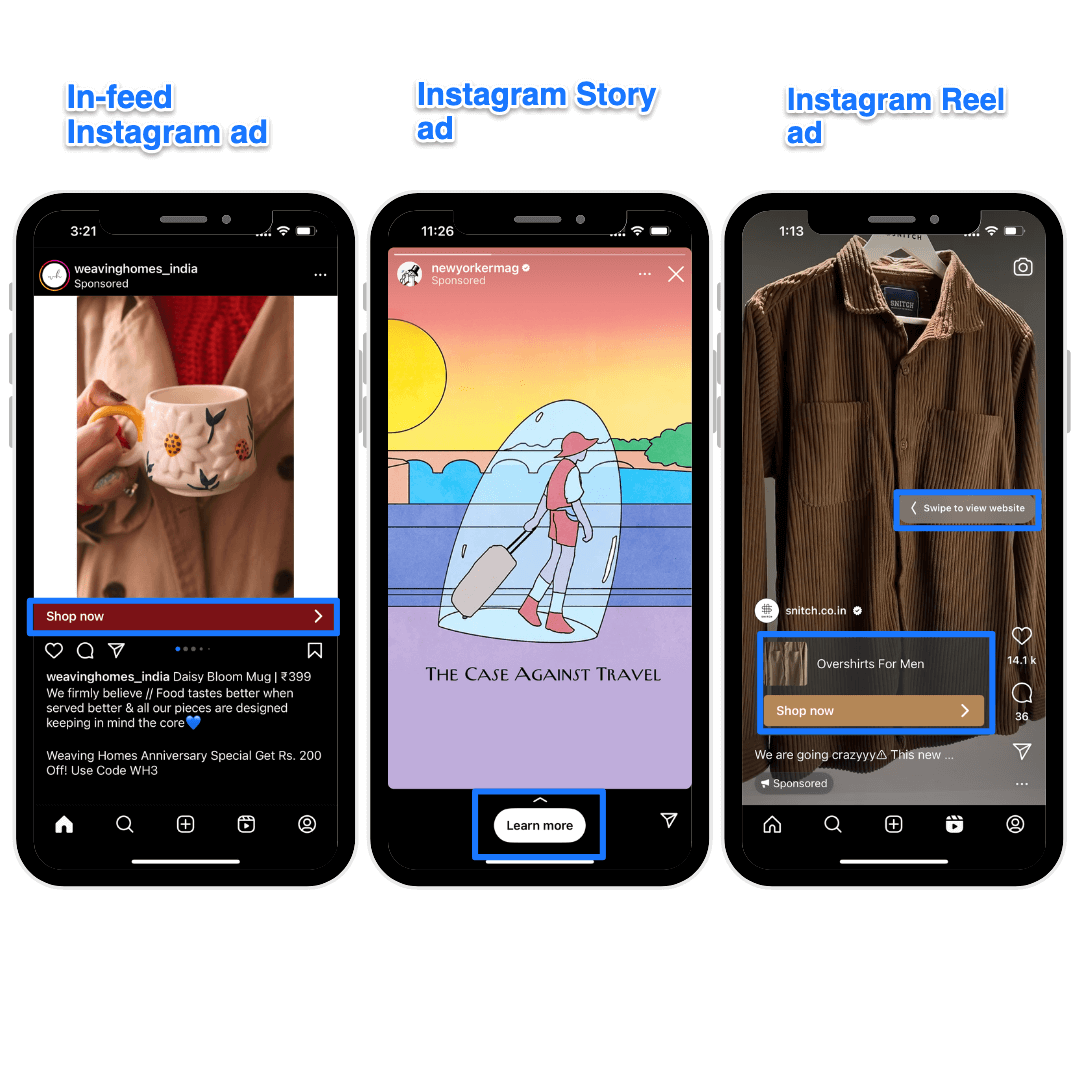
But unlike organic Instagram posts, Instagram ads have a link to redirect users to a website to shop for your products or check out your services. They also have the “sponsored” label. With ads, you’re also not completely reliant on the Instagram algorithm to reach your target audience: You can control (to some extent) the demographics of the audience you want to reach.
If you have the budget, Instagram ads can be an excellent addition to your Instagram marketing strategy. But navigating the ad manager is like untangling a spiderweb. In this guide, I’ll take you from the A to Z of Instagram advertising. By the end of this piece, you’ll be equipped to run Instagram ads successfully (and with confidence!).
💡Note: You need to have an Instagram business account to run ads on the platform. Learn more about how you can switch to a professional account to run ads in our guide to the various types of Instagram accounts.How much do Instagram ads cost?Cost is one of the primary factors in deciding whether you’ll add Instagram advertising to your marketing strategy.
The good news? Instagram ads are quite flexible! You can spend as much or as little as you like. Your ad objectives, placements, formats, competition, niche, seasonality, all affect how much your Instagram ads will cost.
The bad news? This is what often makes Instagram ads complicated. It’s difficult to pull out the “right” number out of a hat and decide how much you should invest to get a positive return on investment (ROI).
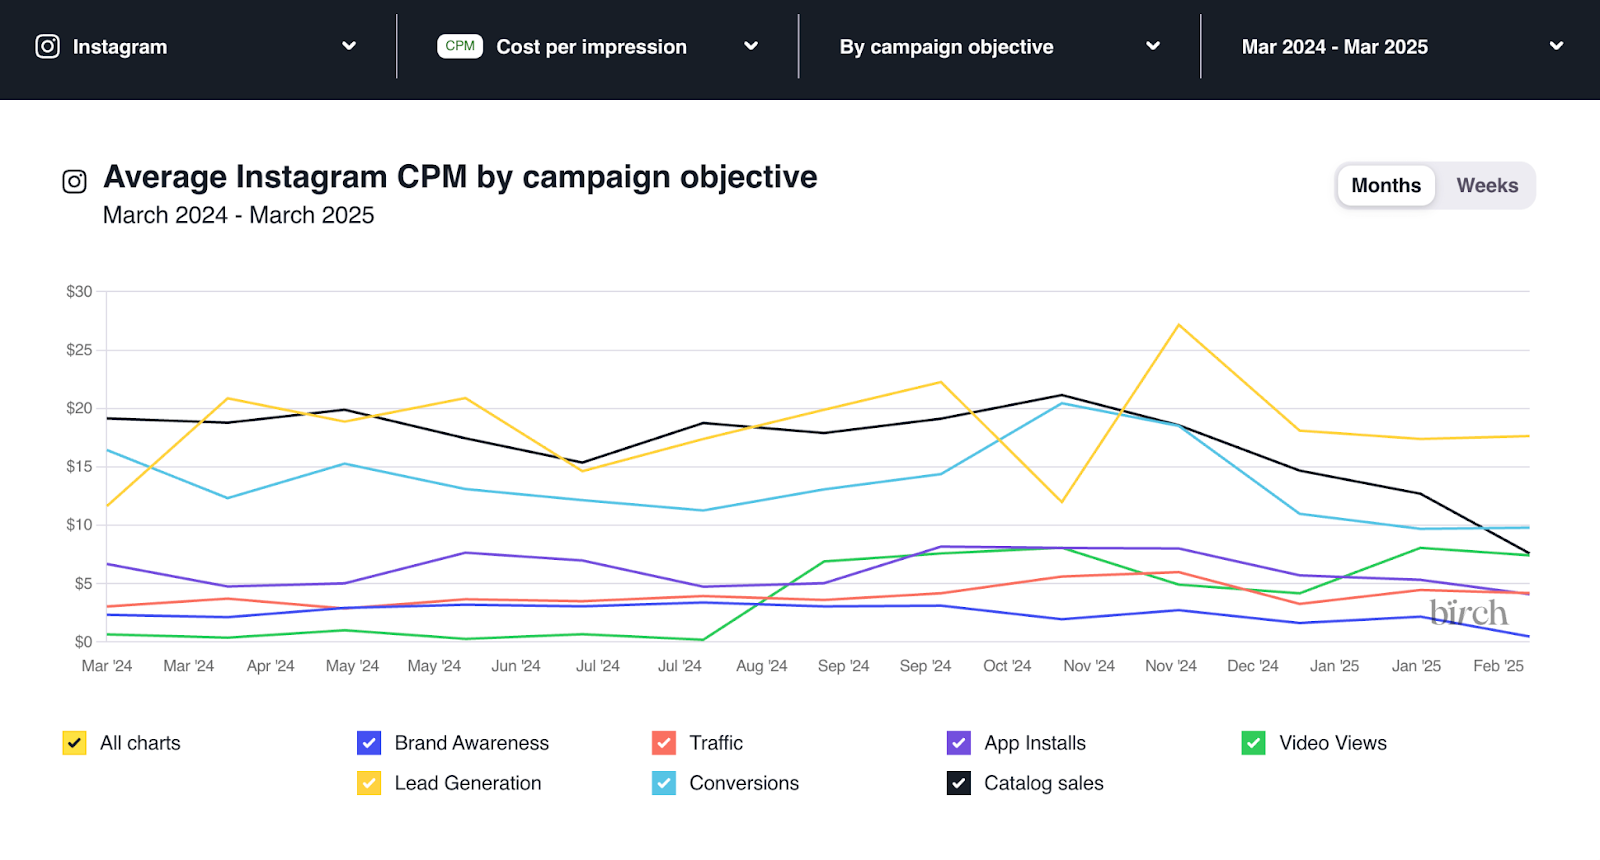
Bïrch shares up-to-date Facebook advertising costs data from hundreds of millions of spend per month in the U.S. As of February 2025:
Metric
Cost
Average Instagram cost per impression (CPM)
$13.66
Average Instagram cost per click (CPC)
$1.36
Average Instagram cost per engagement (CPE)
$0.063
Average Instagram cost per lead (CPL)
$9.23
Average Instagram cost per install (CPI)
$1.99
Play around in Bïrch to get an accurate sense of how much you should expect to spend (and get) from running Instagram ads. You can also dissect the data to dig deeper. For instance, you can filter for average CPM by campaign objectives.
The above numbers will help you set the right expectations, but how much you should invest in Instagram advertising depends on your budget and risk appetite. Ideally, choose a number large enough for you to care about and improve but small enough not to be damaging.
📚Related reading: How I Turned $75 Per Day in Ad Spend Into 1 Million Views on My Instagram Reel With Only 1,000 FollowersHow to run Instagram adsThere are two ways to run ads on Instagram:
1. Boosting a post
2. Using the Meta Ads Manager
Boosting a post is the easier choice, but it doesn’t have the granular control the ad manager has. Let’s understand how both methods work (and where they differ).
💡Note: If you manage and run ads on a Facebook Page, you can link your Instagram business account to it and run the same ads on both channels. But I wouldn’t advise doing this if you aren’t familiar with Instagram at all. Learn the basics of Instagram before running the same ad on Instagram and Facebook.1. Boosting an Instagram postTo boost an Instagram post, all you have to do is click on the “Boost post” option on your Instagram posts.

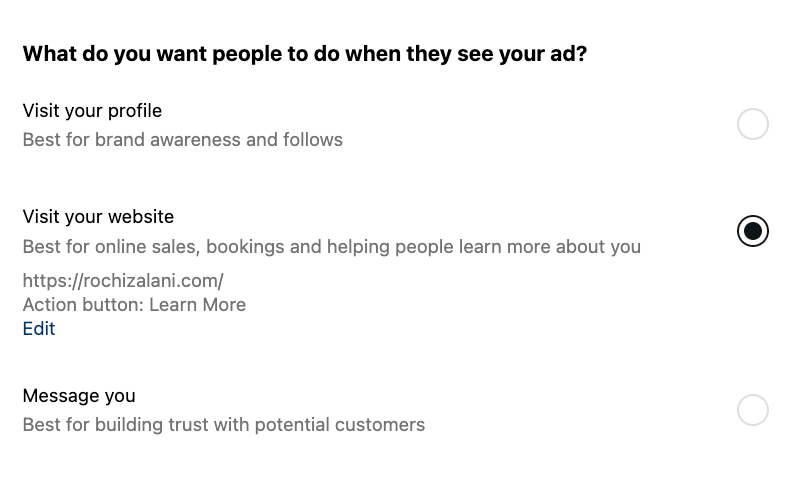
Once you click on “Boost post,” you can:
1. Choose what you want users to do when they see this post as an ad — visit your profile, visit a website, or message you.
2. Choose your target audience — Instagram has a “Suggested audience” option to reach people who are similar to your followers.
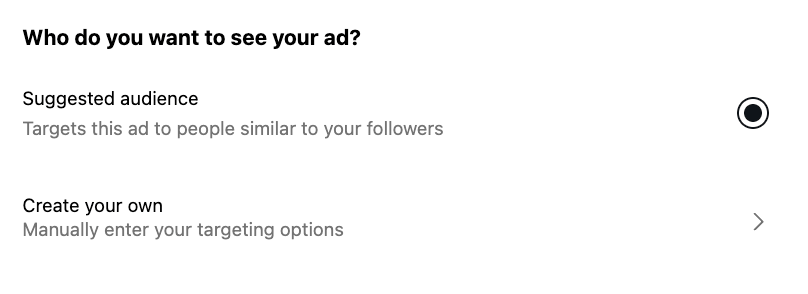
You can also manually enter your desired audience demographics — including location, age, gender, and interests.
3. Decide your daily ad budget (minimum $1 every day) and get an estimate of the daily reach you’ll get using this ad.
4. Decide your ad duration — you can keep running the ad until you manually pause it or set a fixed timeline.
 💡Note: You can follow the same process and run ads via your app, too. But if you download Instagram from the iOS app store, you’ll be charged an additional 30% service fee via Apple. To forego that, I’d recommend using the web to boost posts or add funds in advance to your Instagram ad account.
Pros of running ads via boosting:
- The process is quick and easy
- You don’t have to create an account on Meta Ads Manager
- Boosting posts is cost-effective, especially if you’re on a tight budget
- You don’t have to link your Instagram account to any Facebook Page
- You can double down on your best-performing organic posts by boosting them (it already has the social proof of likes, comments, and shares)
Cons of running ads via boosting:
- You don’t get refined targeting options
- You cannot run a campaign with an objective and various posts
- You can’t run an ad that’s not already been posted organically
- You can’t boost Instagram Reels that have copyrighted music, GIFs, interactive stickers, or camera filters from a third-party app
- You can’t boost Instagram Stories if they have effects added outside of Instagram or if they have interactive elements or stickers
Boosting a post is an excellent option if you’re a beginner to social media advertising and need to learn the ropes before you dive into the ads manager.
You can amplify your content quickly and with more affordability. But it’s best to move to the Meta Ads Manager as soon as you need advanced targeting options.
2. Using the Meta Ads ManagerIf you’ve already used the Meta Ads Manager to run Facebook ads, you’re in luck: The process and the best practices are the same for running Instagram ads.
Pros of running ads via Meta Ads Manager:
- You can create customized reports for stakeholders
- You get granular control over your ads and target audience
- You can integrate your website’s data to understand your audience better and improve targeting
- You can choose from your existing organic content or upload new ad content from scratch
Cons of running ads via Meta Ads Manager:
- You cannot manage campaigns from within the Instagram app
- You have to spend time learning how to use the Meta Ads Manager
- You have to create a Facebook Page to run ads via Meta Ads Manager
- Meta Ads Manager can be less cost-effective and more risky than boosting successful posts
If you’re new to the Meta Ads Manager, the landscape can be overwhelming. But don’t worry — the ad manager is quite intuitive to use. Here’s how to find your way around:
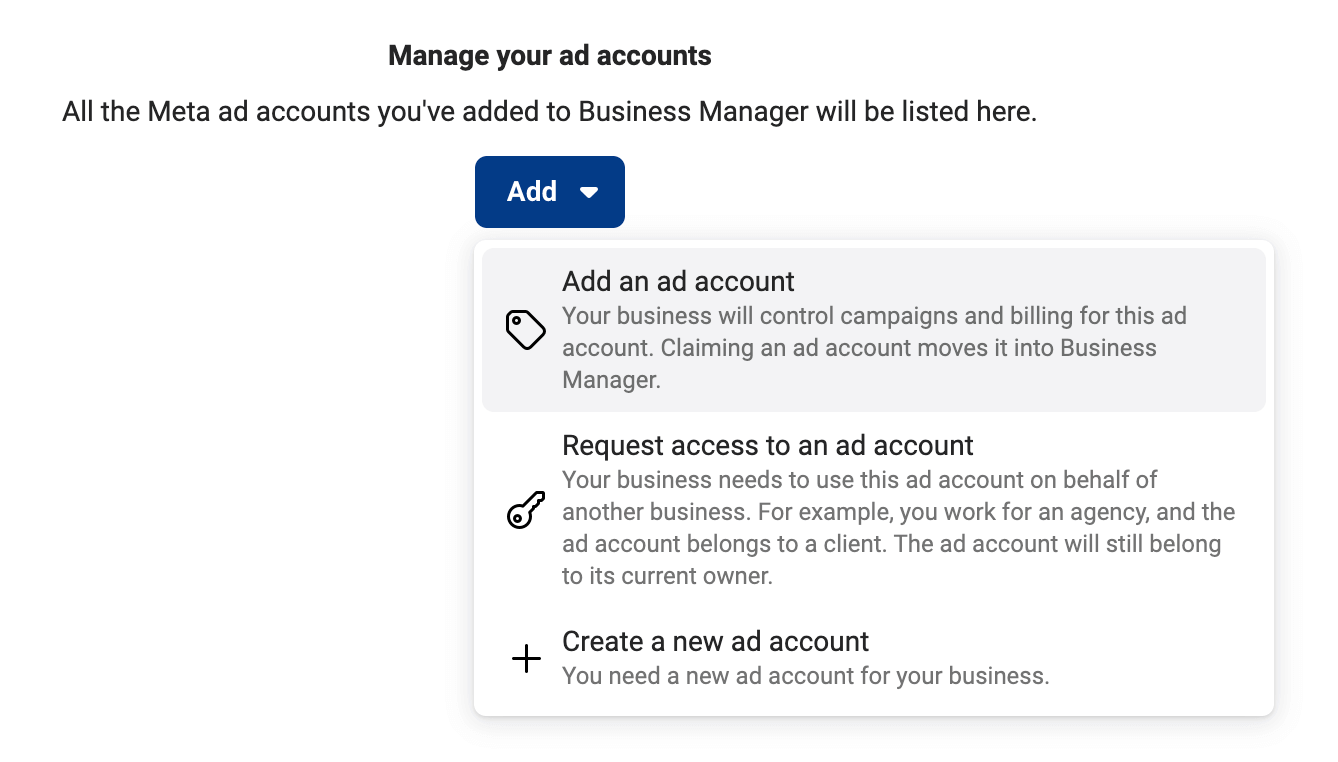
💡Note: You need to have a Facebook Page to run ads using the Meta Ads manager. You can then link your Page and Instagram account to run ads on Instagram. You can only link one Instagram account to one Facebook Page.Step 1: Create an ad account and add your teamGo to the Meta Business Suite to access the ad manager. First, create an account with Meta Business Suite if you don’t have one already. Then, follow the below steps:
1. Go to “Business Settings” after you’ve logged in to your Meta Business Suite.
2. Click on “Ad Account” under the “Accounts” header.
3. You can claim an existing ad account using the ad account’s ID or create a new ad account by giving it a name and entering your region’s currency.
If you’re working with a team, go to “Ad account settings” in your ad manager and find “Ad account roles.” You can offer your members three kinds of access:
- Admins have the same permission as the ad account’s owner. They can create ads, edit payment methods, and modify the access levels of other team members.
- Advertisers can create ads, edit campaigns, and access performance reports. But they can’t modify existing permission settings or your payment methods.
- Analysts can only view ads and access performance reports.
There are three levels to every campaign on Meta.
- The campaign level is the bigger picture of what kind of campaign you’re going to run
- The ad sets level is about your target audience and the frequency you’ll advertise to them
- The ad level is what your prospective buyers see on their mobile app

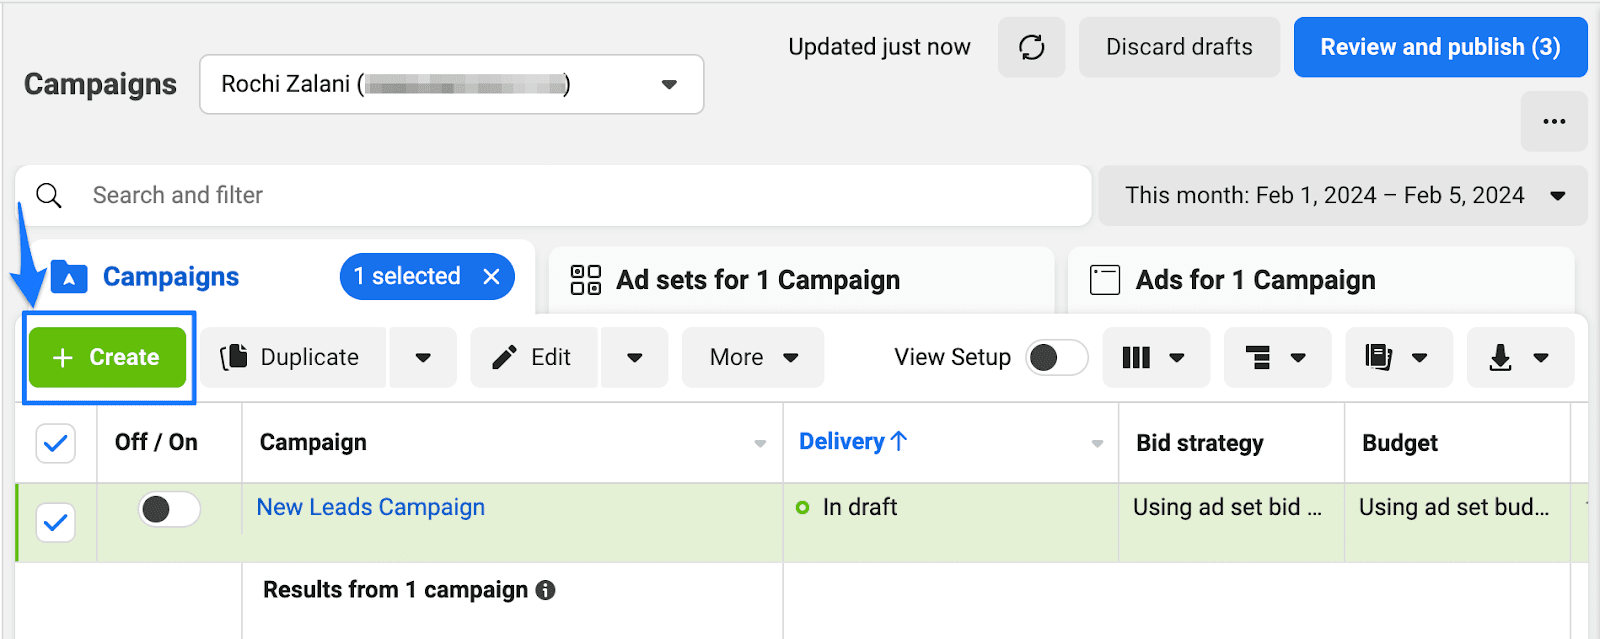
We’ll cover the campaign level in this step. To get started, click on “Create” in the Meta Ads Manager.
Once you click “Create,” Meta will ask you to select a campaign objective. This is the desired action you want your target audience to take after seeing your ad. For example, if your business goal is to increase brand awareness, your ad objective is “awareness.” But if you want to redirect users to a sale on your website, “traffic” is the right objective.
In total, there are six objectives to choose from:
- Awareness: Choose this option when your goal is to increase brand awareness about your product or service.
- Traffic: Choose this option when you aim to boost traffic on your website.
- Engagement: Choose this option when you want to build a community using Instagram.
- Leads: Choose this option when you want to collect leads for your business using Instagram.
- App promotion: Choose this option when you want to promote your company’s app and boost app installs.
- Sales: Choose this option when you want to use ads for conversions.
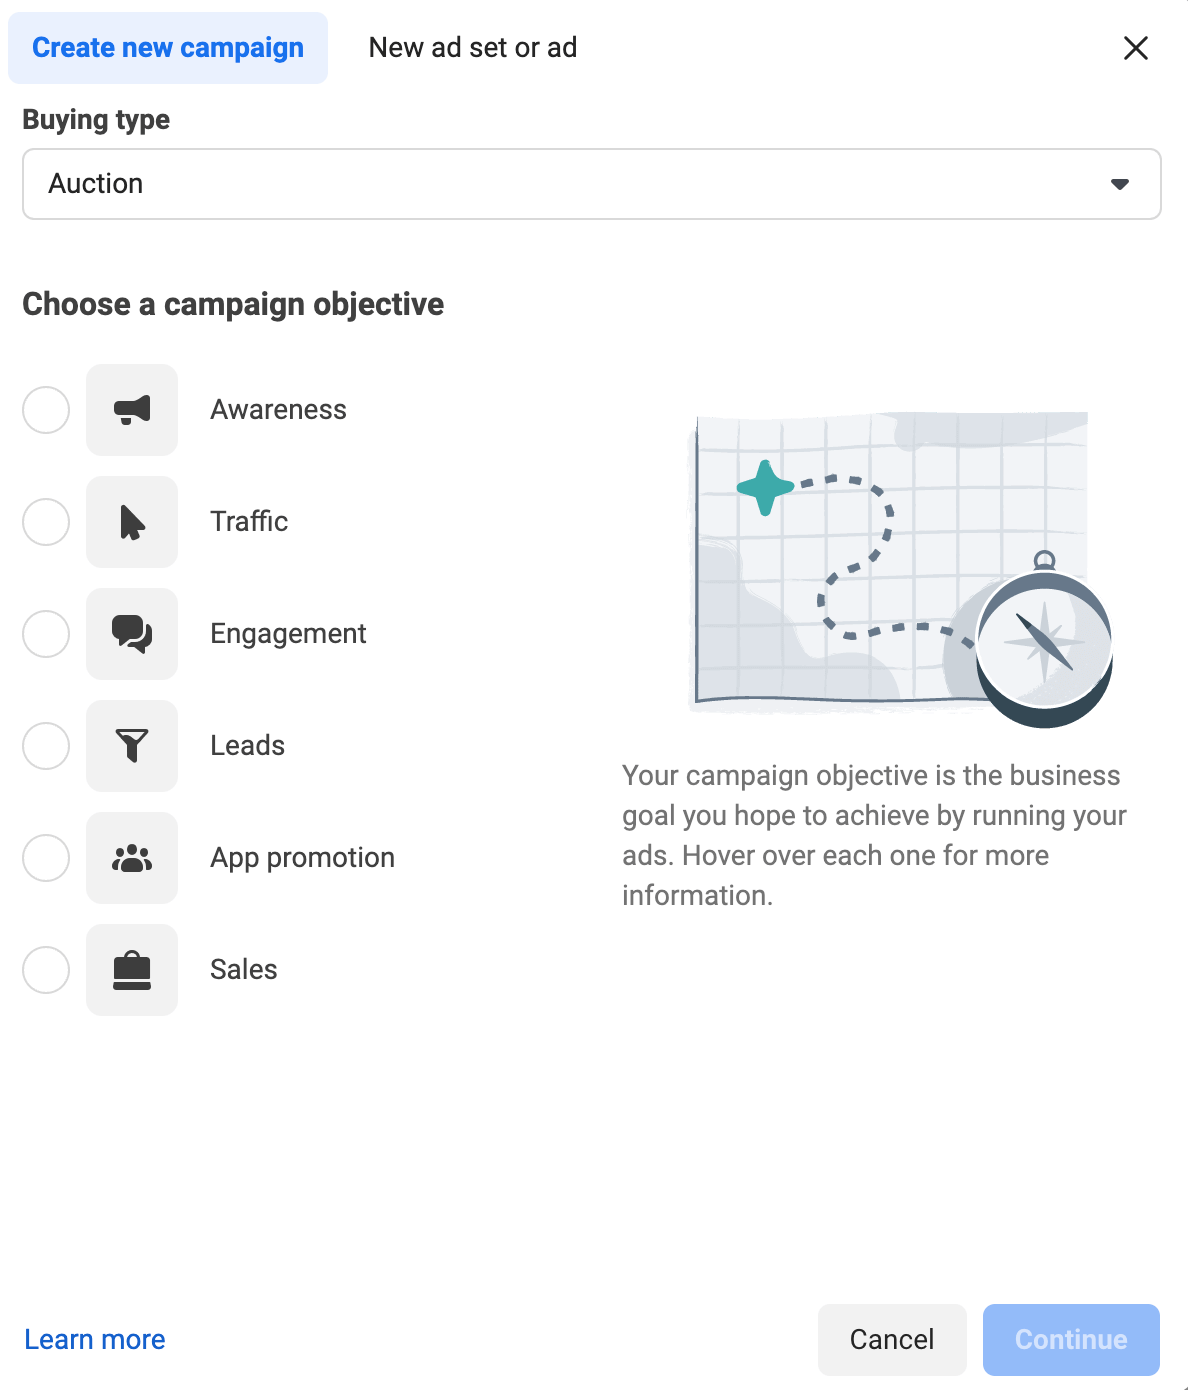 💡Note: The above ad objectives options are for the “auction” buying type — which is the most common choice in Meta Ads Manager. There’s a fixed price on the CPM if you choose Reservations. But you need to have a minimum spend commitment to reach that CPM and there’s overall less flexibility in changing your budget and targeting once you place the ads. Here’s Meta’s advice on choosing the right buying type.Step 3: Create ad set(s) for your campaign
The specifics of the options you see in your ad sets depends on your objective in step two, but you can expect the following:
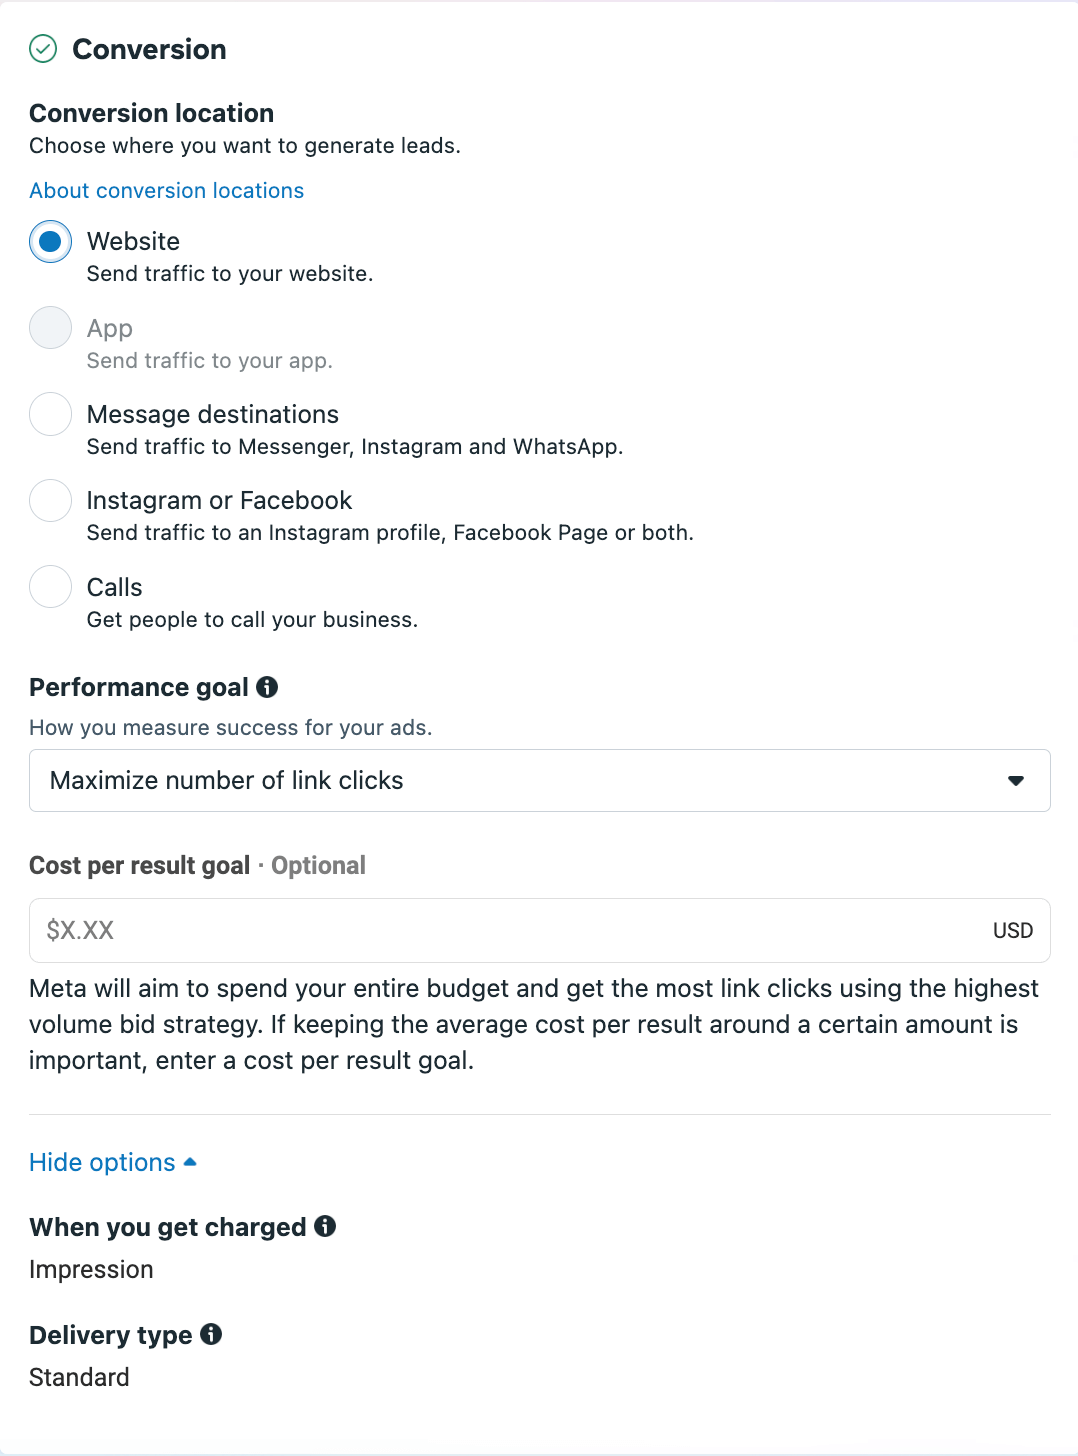
Conversion location
In ad objectives like sales and traffic, you have to choose where you’d like to redirect the viewers watching your ads — your website, your DMs, etc.
Performance goal
This is how you measure the success of your ads. You can choose from various metrics depending on your objectives.
For example, in the awareness ad objective, your performance goal can be maximizing ad reach, the number of impressions, or the ad recall. Similarly, in the traffic ad objective, your performance goal can be to maximize the number of clicks.
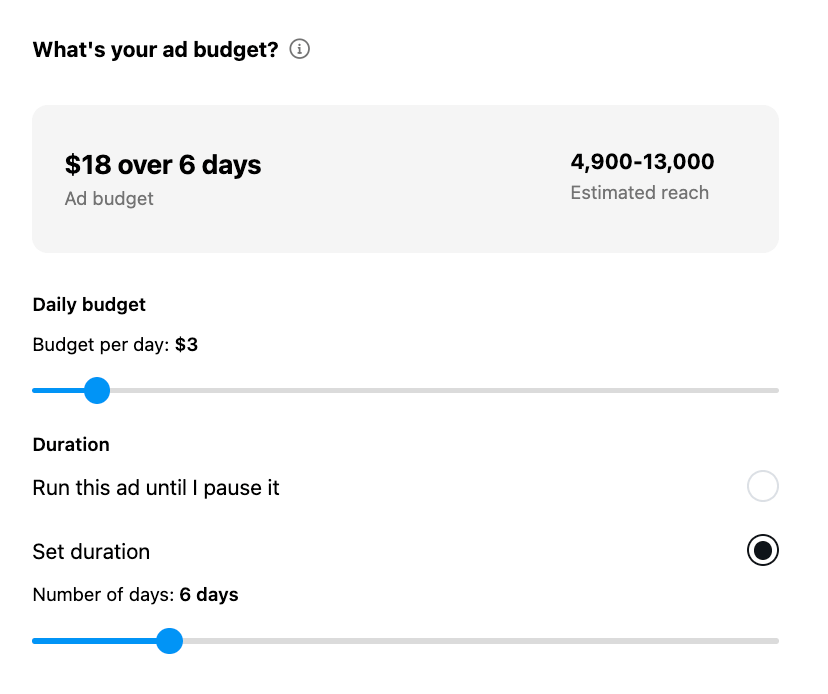
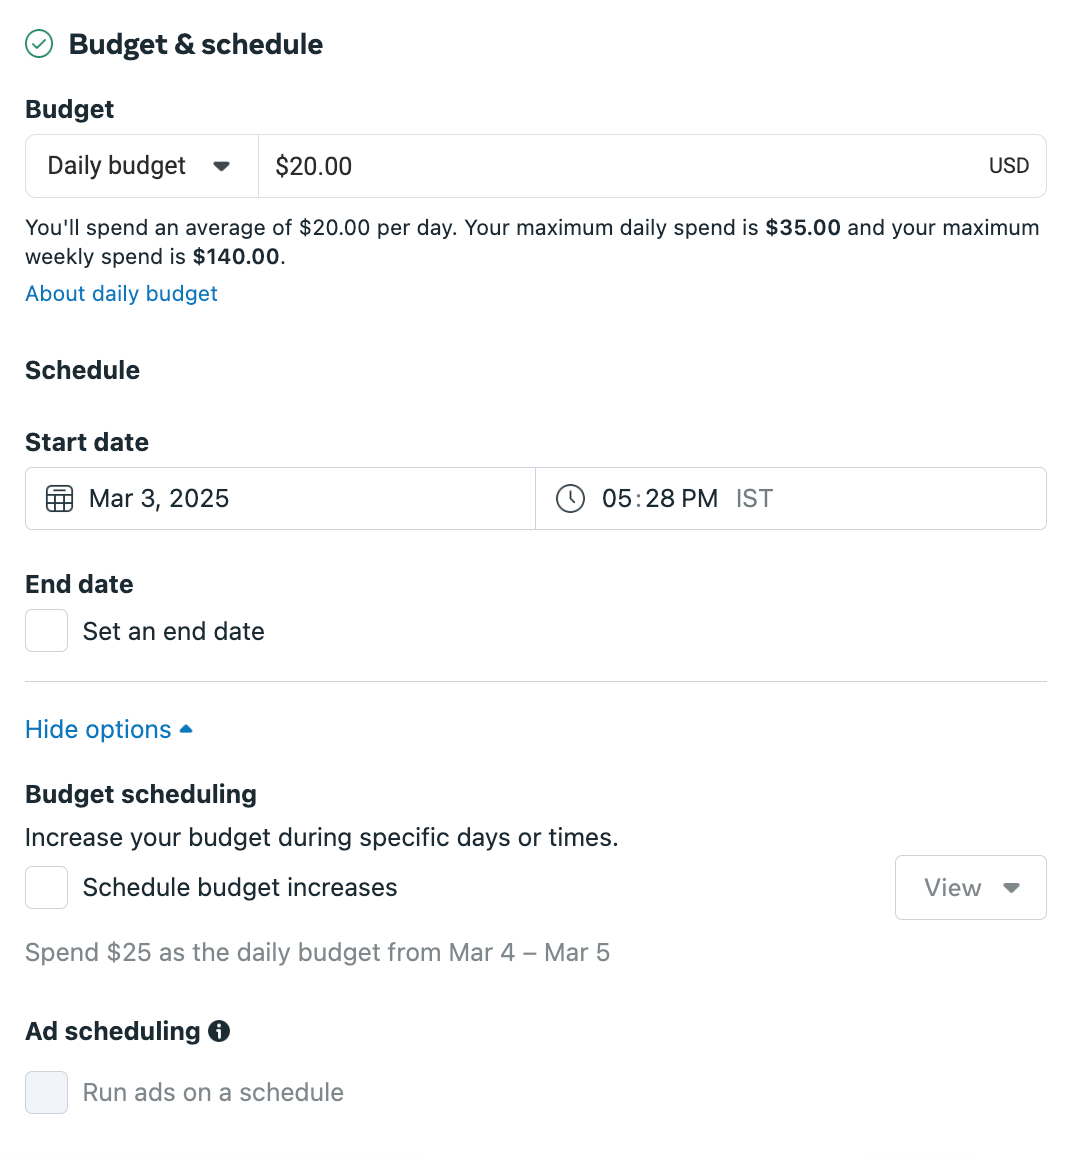
Budget and schedule
You have to decide how much you’ll spend daily or in the lifetime of your campaign and set the schedule of your start and end date. If your business experiences seasonal demands, you can also choose to increase your budget during specific days or times.
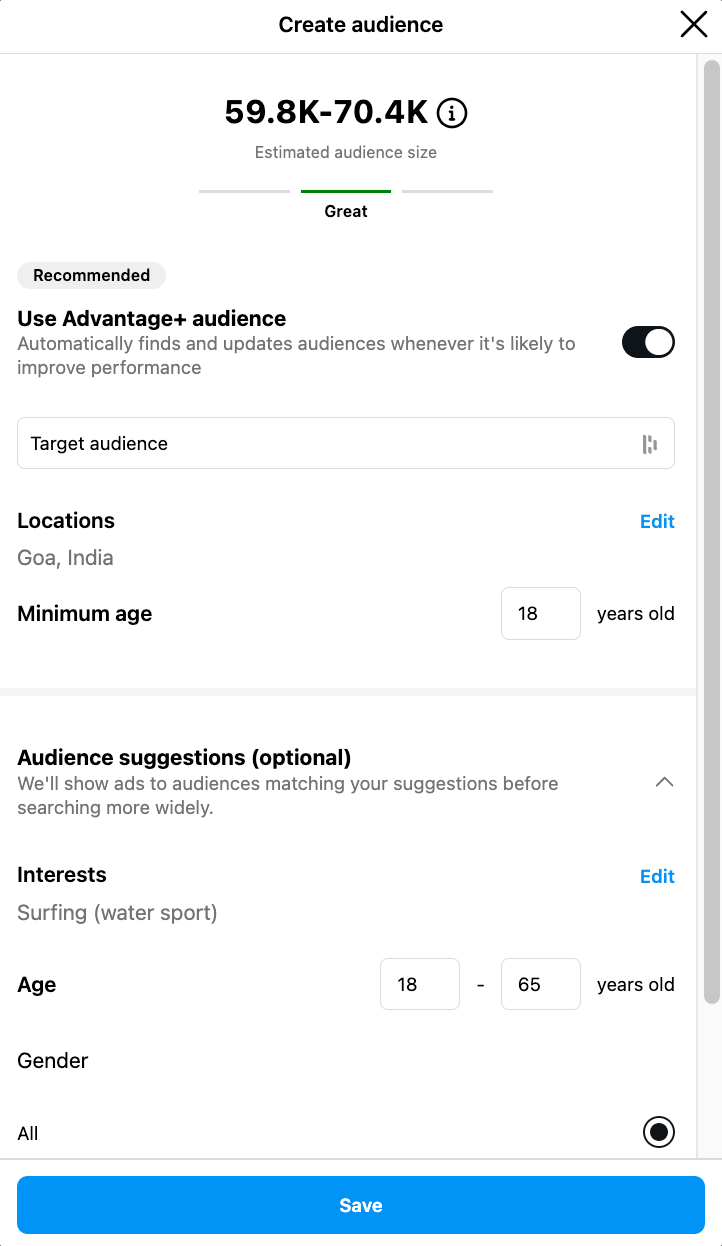
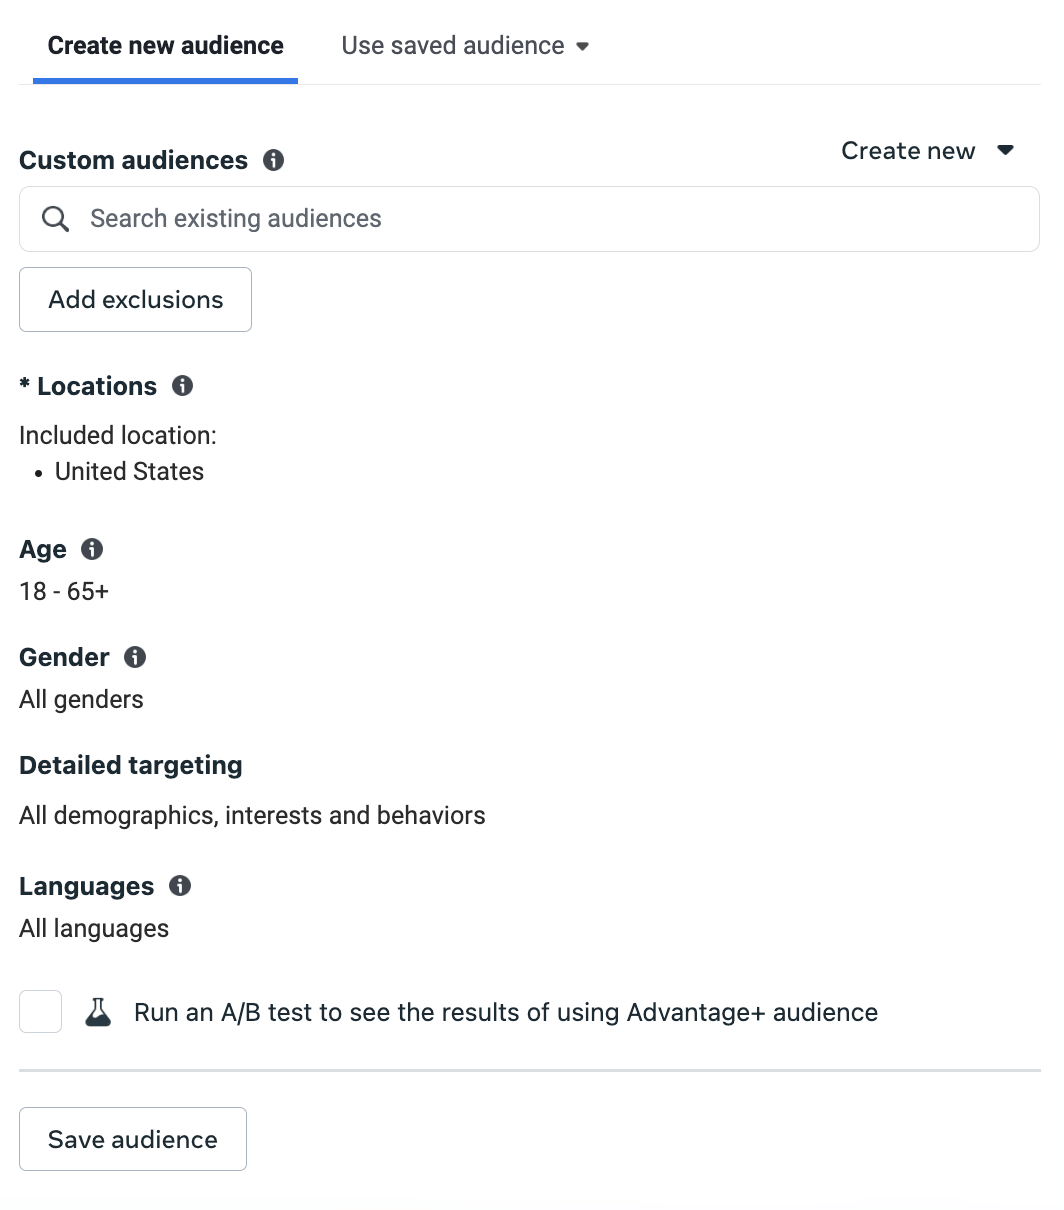
Audience controls
Select your target audience’s demographics — location, age, gender, and languages.
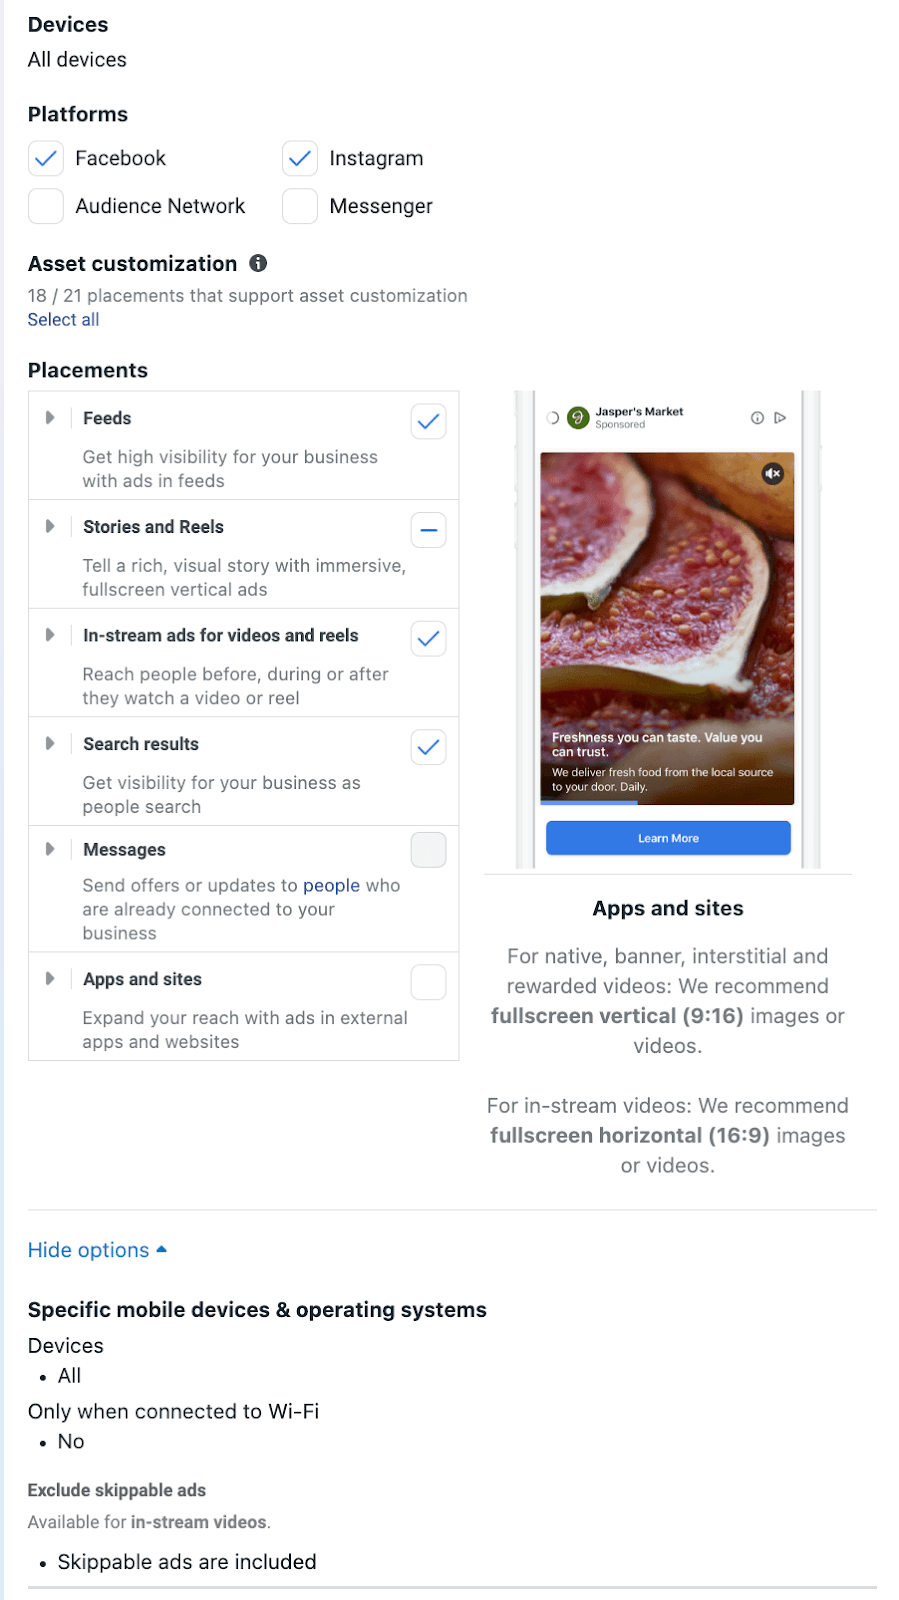
Ad placements
Placements are exactly where you want to place ads on your Instagram account. Apart from Instagram’s various content formats (Stories, Reels, in-feed posts, Explore), you also get the option to run the same ads on your Facebook Page, Messenger, and Search results.
You can also customize your settings for specific mobile devices and WiFi connections.
 ⚡Remember: You can have multiple ad sets within the same campaign. For example, let’s say you’re running a sale on a product category. One of your ad sets can redirect people to product A, and another can lead them to product B. Both ad sets are part of the same Instagram ad campaign (the sale), but they carry different products.Step 4: Craft your Instagram ad(s)
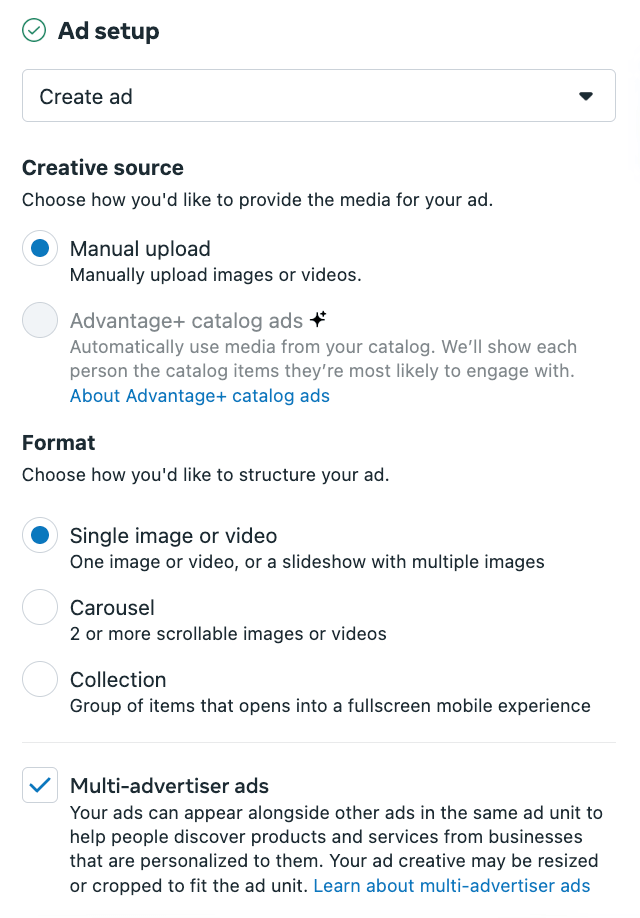
At the last level, you upload the ad content you want to run on Instagram. This is the ad your audience will see in their mobile app. There are four primary sections at the ad level:
Ad setup
You can upload a new ad from scratch, use an existing post to run as an ad, or use any mockups you have in Meta’s Creative Hub.
You also have to choose an ad format — a single image or a single video, a carousel, or a collection (group of items that opens into a fullscreen mobile experience).
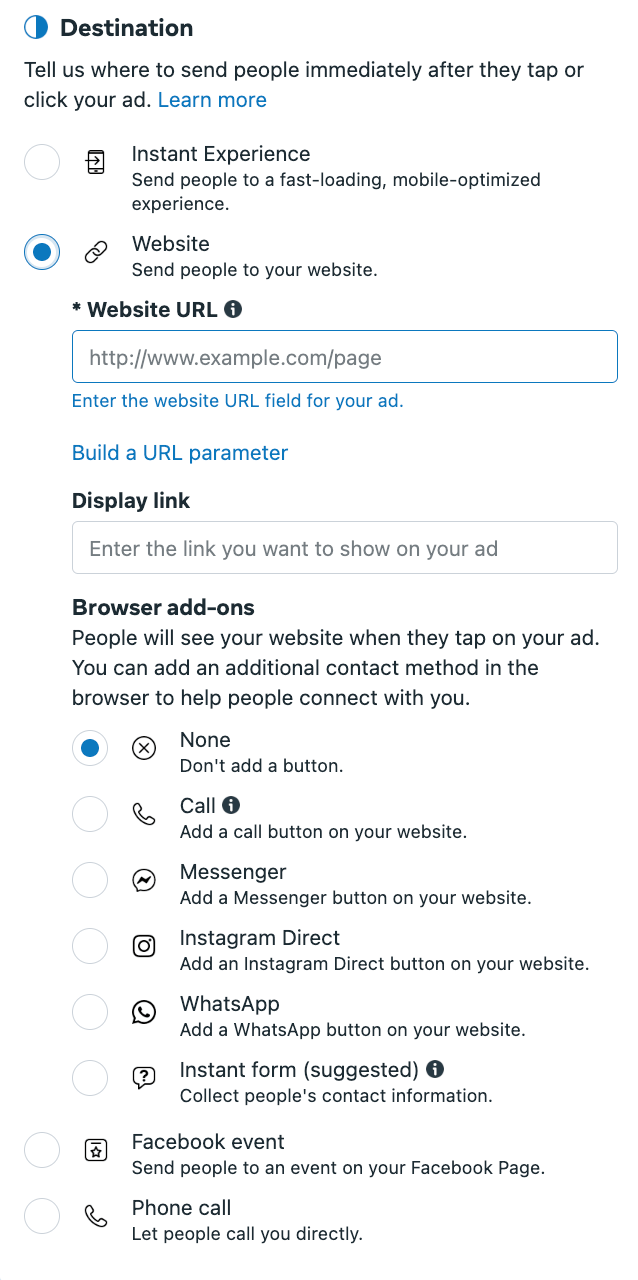
Destination
Choose where you’d like to send people when they click on your ad. You can add a specific URL, an event on your Facebook Page, or call you directly.
If you’re redirecting ad viewers to a website, it’s imperative you set up Meta Pixel in your ad account to track performance accurately. Meta Pixel is just a piece of code you need to add to your company’s website to measure precise ad results and optimize targeted audiences. Here’s an article from Meta explaining more.
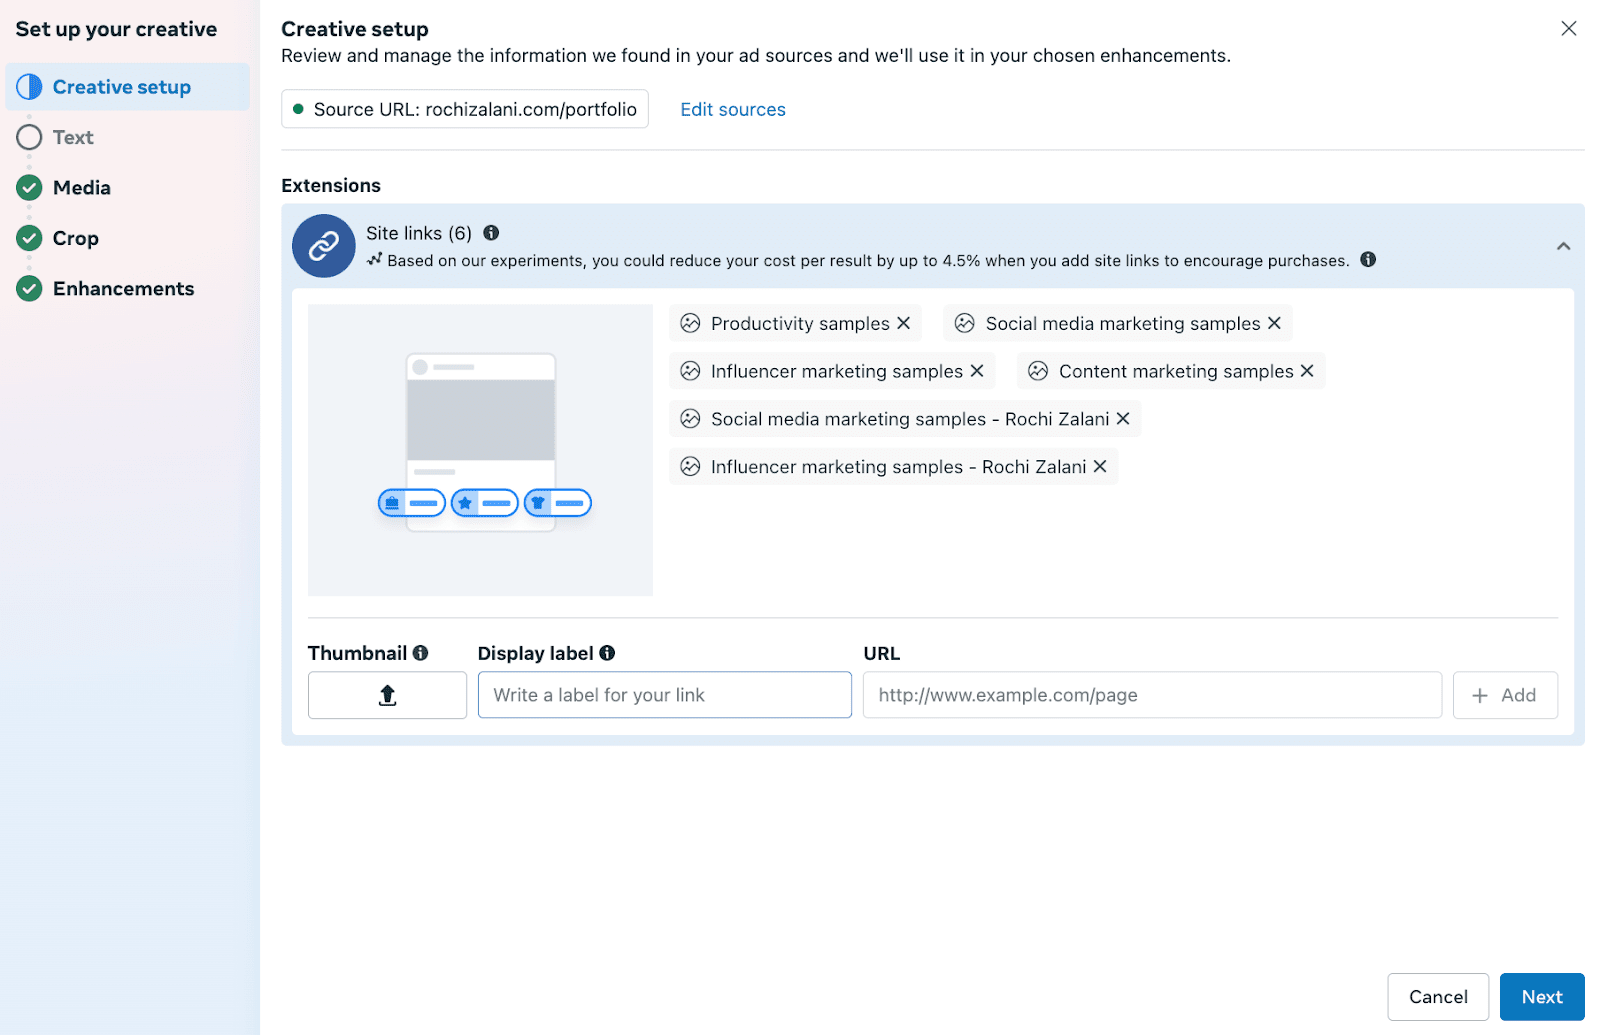
Ad creative
This is where you upload your image or video. You can also source the ad content from a URL. In the creative setup, you have granular control over the thumbnail, ad copy, display label, call to action, and more.
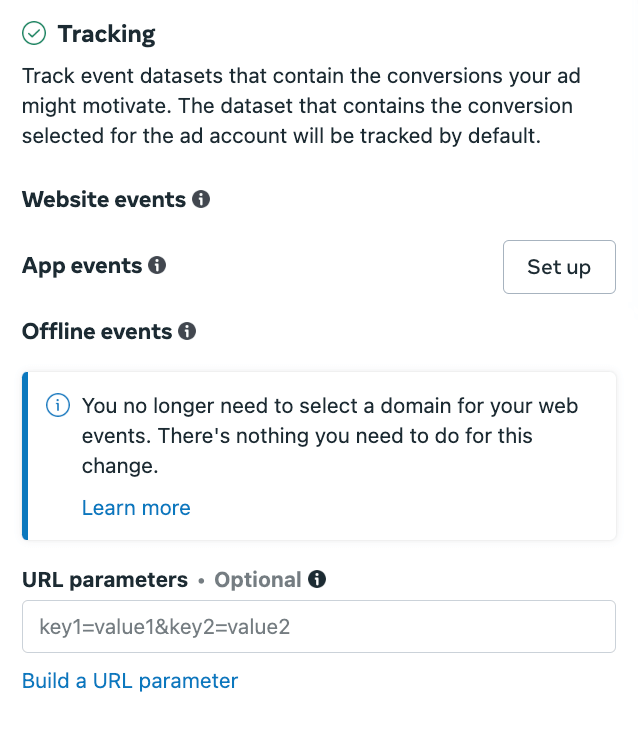
Tracking
Here, you can set up various ways to track your ad performance (like the Meta Pixels we talked about earlier). You also have simpler alternatives like UTM parameters. Buffer has a free UTM builder that can come in handy here. 😉
Once you hit “Publish” your ad(s) will be live! Voila 🥳
That might seem like a lot, but it’s easy to pick up the pace and keep going once you start. Meta Ad Manager is easy to use and has directions at every step of the way.
5 best practices for successful Instagram adsRunning ads isn’t just about the logistics — there’s a ton of strategy work going behind improving the ROI from each ad. Here are five beginner-friendly pro tips.
1. Use Meta Advantage to your advantageMeta has various Advantage+ options placed everywhere — from your ad set to your ad creative. Meta Advantage is using the best of AI within Meta to improve the ROI of your Instagram ads.
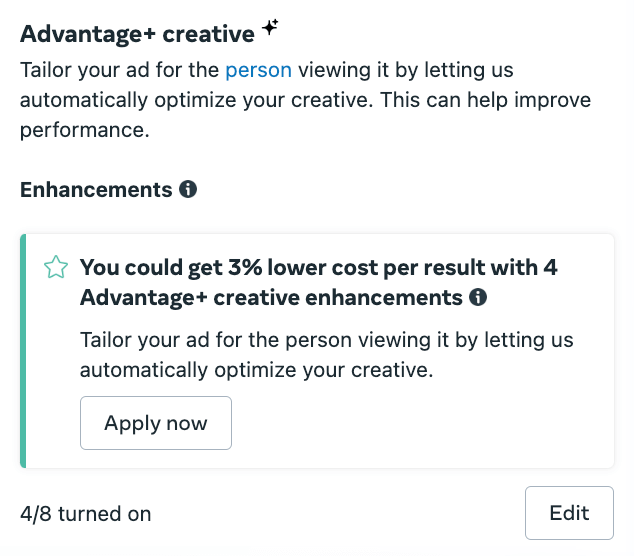
Whenever you see Advantage+ while running your Instagram campaigns, use them — especially if you’re a beginner. This will allow Meta to do its magic and give you the most bang for your buck.
I’d advise even pros to experiment with A/B testing Meta’s advantage recommendations versus their manual placements to check which performs better. Meta’s machine learning system is strong and reliable — use it to not only enhance your performance but also reduce your efforts.
2. Rely on Meta’s campaign score to improve your Instagram adsMeta provides a campaign score between 0–100 to show you how well you’ve optimized your ads based on Meta’s recommendations.
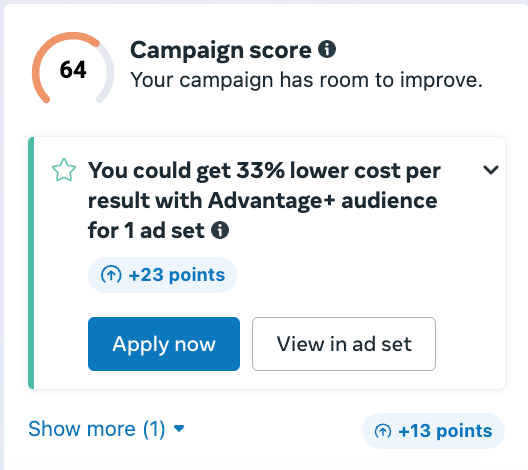
While this number doesn’t dictate future performance, think of it as a predictive score to analyze where you can improve your ad performance. Try to get the green light (unless you have a solid reason to go against Meta’s recommendations).
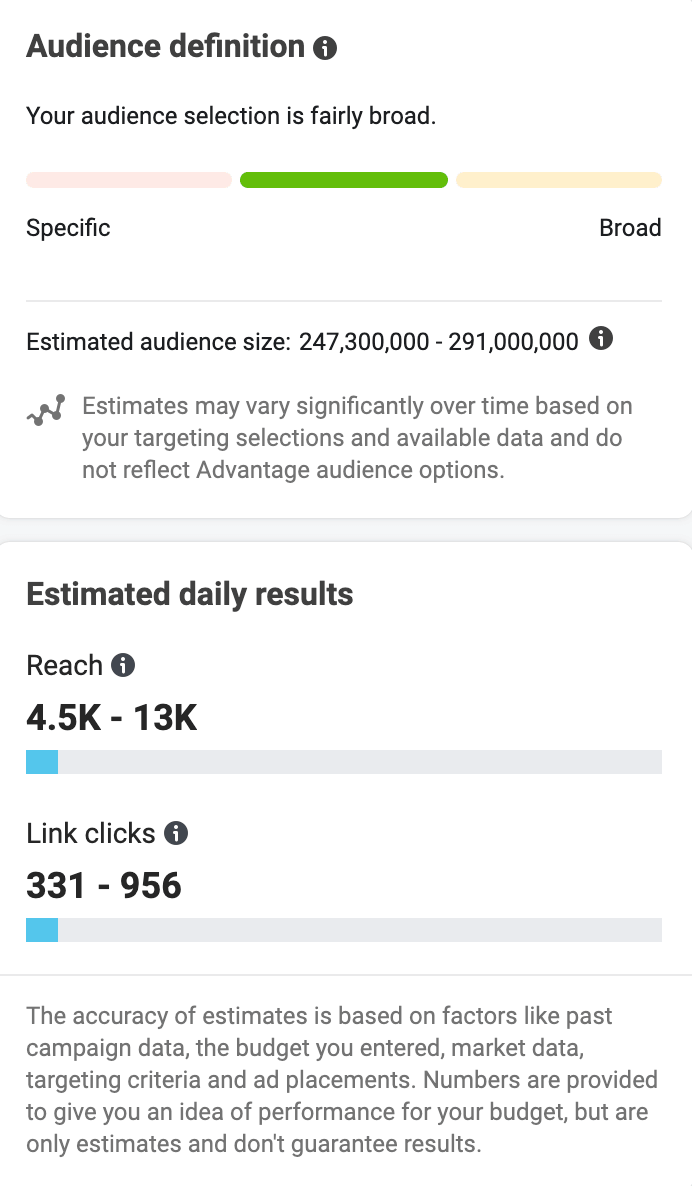
Similar to campaign score is the audience definition: This is how wide or broad of an audience you’re reaching with your ad campaigns. You don’t want your audience to be too specific (unless you’re selling in a niche, local market) — otherwise, you miss people who might’ve been interested in your products or services.
 3. Keep your ad visuals and copy clear, concise, and crisp
Clear > clever, every time. Especially when it comes to Instagram ads. Don’t have cluttered visuals or an ad copy that’s clever, but hard to read.
Remember people are scrolling on the platform when they’re busy or idle — you want to grab attention fast. Here are some actionable tips:
- Answer “what’s in it for me?” right away for potential customers and use copywriting formulas to your advantage
- Don’t bury the offer (like a discount code) in an ad’s caption. Highlight it in the pictures and videos clearly
- Ensure your ad preview looks eye-catching in all ad placements if you’re using the same creative
- Show real people using your product in ads to help people resonate with your brand
Meta’s reporting features are excellent to help you understand what’s working well in your ads and what needs improvement.
In the Overview tab, you can customize the duration for which you want to see ad insights and also filter data using various parameters. For example:
- You only want to monitor ad performance you landed on the Instagram Explore page. You can filter for this using search.
- You only want to see your ad's engagement metrics (post likes, comments, shares). You can customize this using columns.
- You only want to track ads you published in the U.S. market. You can refine your ad manager dashboard using breakdown.
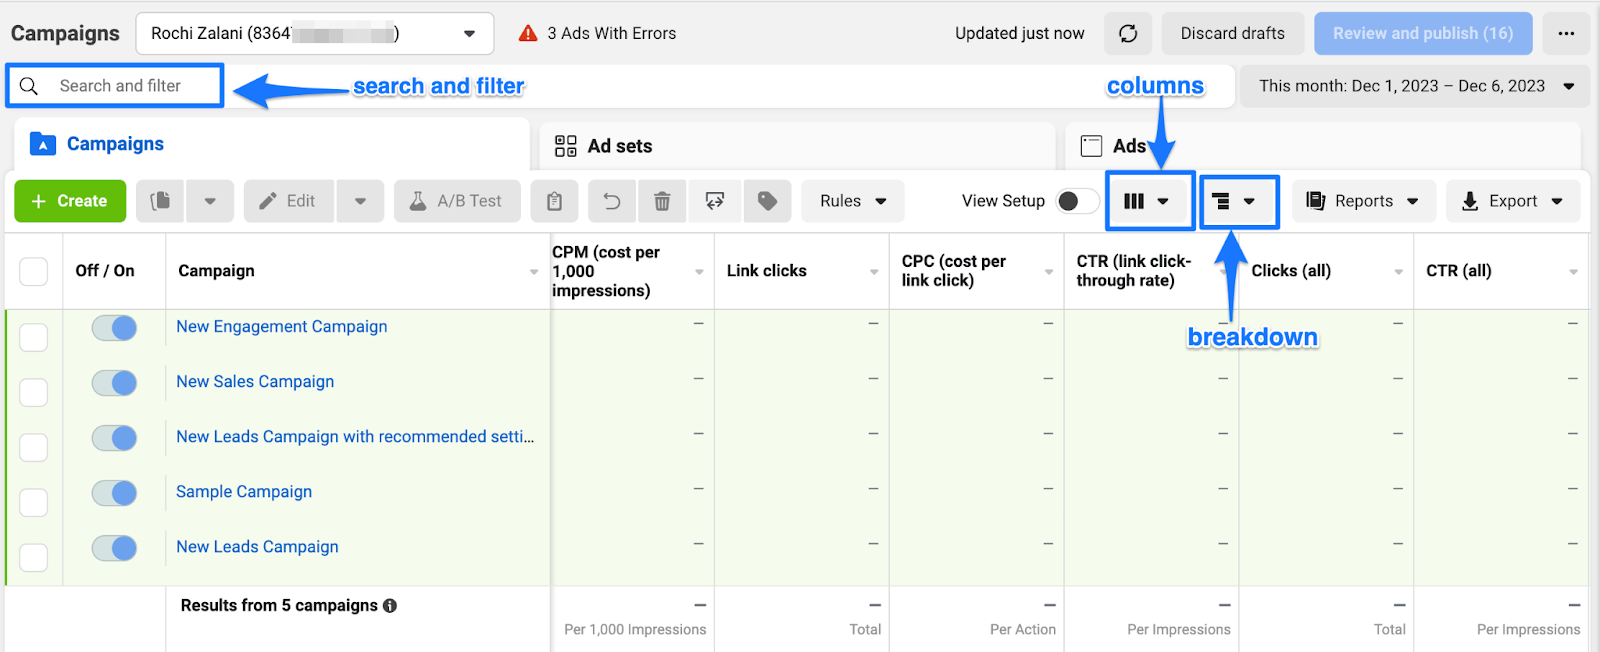
You can find similar numbers for Boosted posts, but they’re not as in-depth as the Meta Ads Manager.
Monitoring the numbers you care about regularly is useful for ensuring you’re meeting your social media goals. Set time aside in the middle of and at the end of every campaign to analyze your ad performance and understand how you can improve.
5. Start with boosting your best-performing postsIf you’re overwhelmed, strapped for time, or on a shoestring budget, experiment with Instagram ads using “Boost posts” instead of setting up a whole campaign in the ad manager. Boosting posts is like the trial version of Instagram ads — it can help you learn the ropes, get some confidence, and spend your money cautiously before you dive deep.
For best results, boost your best-performing Instagram posts. They already have the credibility of likes, comments, and shares. And what’s performed well organically will likely do well in ads, too.
Instagram ads aren’t in a siloInstagram advertising is a great addition to your Instagram strategy. But ads alone aren’t the only way to grow on Instagram. While ads may boost your Instagram reach in the short term, advertising without organic efforts is not a well-rounded social media strategy.
As you dabble with the Meta ads manager, don’t forget to also continue your organic marketing efforts side-by-side. Wondering where to begin? Here are some ideas on what to post on Instagram.
And to make your Instagram marketing journey even easier, sign up for Buffer (for free!) and start scheduling Instagram posts, storing content ideas, using AI to make your life easier, and a lot more.