and the distribution of digital products.
How To Clear DNS Cache on Windows, Chrome, Firefox and Safari With 5 Easy Steps
The Domain Name System or commonly known as DNS plays an important role in browsing the internet. It is a part of the internet’s infrastructure that translates domain names into IP addresses. In simple terms, DNS serves as a phonebook for the internet. However, with time, a DNS cache builds up which may cause issues like slow page loading or “server not found” errors while browsing.
Therefore, it is necessary to clear this cache from time to time for proper functioning of your browser. To ease out your work, here is the complete guide on how to clear DNS cache on Windows, Chrome, Firefox and Safari.
Clearing DNS Cache on WindowsMicrosoft Windows is the most widely used operating system for professional as well as for personal use and has many versions. But irrespective of the Windows version, the process of clearing DNS cache is the same for all. Let’s see how we can flush the cache on Microsoft Windows.
Step 1: Click the Windows Start menu, type “Command Prompt” into the search bar, and click it.
Step 2: Choose “Run as administrator” at this point. It will open the “Administrator: Command Prompt” window.
Step 3: Type “ipconfig/flushdns” into the command bar and hit the Enter key.
Step 4: A confirmation message stating that the DNS Cache has been cleared will be shown to you when the command has been successfully executed.
Step 5: To make sure the DNS cache has been fully cleared, restart your computer.
 Clearing DNS Cache on Chrome
The most popular web browser across the globe, Google Chrome, maintains its own DNS cache. Here are the steps on how to clear its DNS cache.
Step 1: Select the 3-dot menu icon in the top-right and select “Settings”.
Step 2: Click on “Privacy and Security” from the left sidebar and select the “Clear browsing data” tab.
Step 3: A window will appear showing the list of items which can be cleared. Change the time range to “All time” and check the boxes for the items to be flushed(as shown).
Step 4: Click on “ Clear data” to remove all DNS cache from Google Chrome.
Step 5: Restart your Chrome browser for the changes to apply.

Also Read ➤ ➤ A Guide to Delta Exchange Futures Trading
Clearing DNS Cache on FirefoxKnown for its enhanced security features, Mozilla Firefox also maintains its own DNS cache. You can follow these simple steps to clear it.
Step 1: Go to the three horizontal lines icon in the top right corner of the Firefox window. Click on it and select “Settings”.
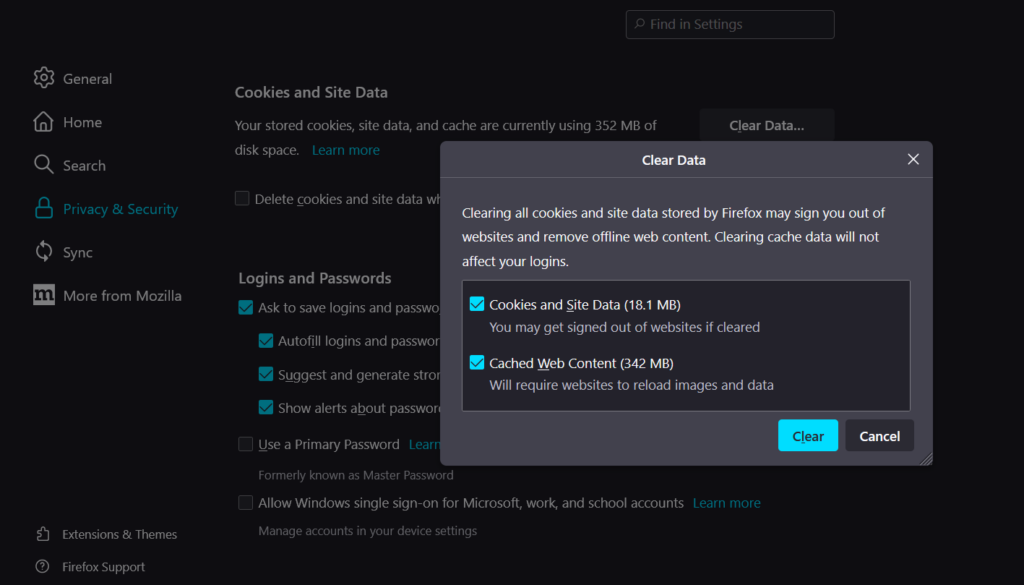
Step 2: Select “Privacy & Security” and scroll down to “Cookies and Site Data”.
Step 3: Click on the “Clear Data” button. A small window will appear (as shown).
Step 4: Check the box besides “ Cached Web Content” and click on “Clear”. (You can also check the box for “Cookies and Site Data” if you want to clear that data too.)
Step 5: Restart the Firefox browser for the changes to apply.
 Clearing DNS Cache on Safari
Safari is the default web browser on macOS and iOS thereby greetings its own DNS cache. Follow the given steps to flush it.
Step 1: Open the Safari browser and select “Safari” in the top menu.
Step 2: Click on “Preferences” and go to the “Advanced” tab.
Step 3: Next we have to enable the Develop menu. For this, check “Show Develop menu in menu bar”.
Step 4: Click on “Develop” in the menu bar and select “Empty Caches”.
Step 5: Close and reopen Safari to ensure that the DNS is cleared.
Conclusion
DNS cache is necessary for quick domain resolves, but troublesome browsing might result from an oversized cache that contains out-of-date data. In order to resolve issues like slowly loading websites, connection difficulties, and being redirected to incorrect IP addresses, it is imperative to regularly clear DNS cache.
You can easily remove the DNS cache on your Windows or MacBook device by following these 5 easy steps. But remember that while your browser rebuilds its cache with new DNS information, clearing the DNS cache may momentarily slow down your surfing experience. Still, it’s a tiny price to pay for fixing annoying internet problems.
- Home
- About Us
- Write For Us / Submit Content
- Advertising And Affiliates
- Feeds And Syndication
- Contact Us
- Login
- Privacy
All Rights Reserved. Copyright , Central Coast Communications, Inc.