and the distribution of digital products.
Building a Device Manager App on Android: Lessons from Managing 300K+ Terminals
Years back, I always wondered how Android-based MDM solutions and device management worked. There wasn’t a lot of online info on enabling this at both the Android OS platform level and the application level for COTS devices. In this post, I wanted to discuss how to configure, enroll, provision, and use Android Device Manager to manage a fleet of large devices at scale.
\n At GoDaddy, we manage 300k+ Smart Payment Terminals using our in-house Device Management Solution. Here, I wanted to share some lessons from my experience and a few established open-source methods that Android OS offers to accomplish Device Management.
Some key use-cases Manage a Large Quantity of Android-based POS Payment Terminals- Remote Configuration and Updates: Update firmware, add new payment applications, and push the latest security patches to all terminals.
- Monitoring and Transaction Logs: View transaction data, check on security compliance for PCI DSS, and collect bug reports in case of a system crash.
- Security Enforcement: PCI security standards enforcement, encryption policy control, and prevention against device tampering or fraud.
- Kiosk Mode Configuration: This option will help in locking the device to run only the payment apps or any other select applications while keeping all the other unnecessary apps tucked away.
- Bug Report Generation: Automatic bug report generation and sending in case of any issues at the terminal or system failure for quick diagnostics.
\
Manage Company or Organization-Issued Android Phones for Employees- App Management: Bulk installation, updating, or removal of work-related apps and restriction of unnecessary apps remotely.
- Security Policies: Enforce password strength, camera disablement, restriction to multiple applications, and data encryption.
- Remote Data Wipe or Lost/Stolen Device: Factory reset or wipe off sensitive data remotely on your lost or stolen device.
- Location Tracking: Location tracking of phones distributed by the company keeps employee phones within a radius.
- Enforce Usage Limitation: Block usage of personal apps during working hours in order to make them focus and reduce the number of distractions.
App and Content Control: Push educational apps and block social media or entertainment apps to ensure that the use of the tablet is for learning purposes.
Classroom Mode: The teacher can see the activities going on in the tablet, push content, and lock the device during exams or study hours.
Software Updates: Remotely push OS updates and patches to all devices continuously for security and functionality.
Remote Management: Allow IT administrators to diagnose problems, monitor usage, and address device malfunction from a distance.
\
- For COTS devices where there is no OS control
- Android OS — cases in which there is full OS control to build a system app signed using the platform key
\
Commercially off the shelf TabletsFor COTS devices, it’s essential to first register the Device Manager app package with the Google Android Enterprise Management portal. This will establish the Device Manager App we are trying to build as the MDM provider.
\ Create an enrollment token
POST https://androidmanagement.googleapis.com/v1/{parent=enterprises/*}/enrollmentTokens\ Input:
- userAccountIdentifier: This field allows you to associate a specific user account with the enrolled device. If not specified, the API will generate a unique user account for each device.
- Policy: The enrollment token can be linked to a specific policy, which defines device behaviors, apps that must be installed during setup, and various configuration settings. Policies allow enterprises to enforce security requirements and automate device configuration.
- OAuth 2.0 Authorization: The request requires OAuth 2.0 authentication, providing secure access to the API using a valid token.
\ Output:
enrollmentToken Object: Contains the enrollmentTokenId and a QRCode link, which is then used by the end user for device provisioning. This token is crucial for enrolling COTS devices under management without manual configuration.
\n
Provisioning can be done in multiple ways in this example; however, we will focus on achieving this via QR code, which is the most widely used option.
\ The other popular ways include,
- Zero Touch Enrollment
- NFC
- DPC Identifier
\ Refer here to explore other options: https://developers.google.com/android/management/provision-device
\ Once an enrollment token is created, provisioning can be initiated using the provided QR code. On a factory-reset device or a new device, the user simply taps the screen six times in the same spot, triggering the device to prompt for a QR code. The QR code is then scanned to begin the provisioning process.
\ Provisioning with QR Code Example,
{ "android.app.extra.PROVISIONING_DEVICE_ADMIN_COMPONENT_NAME": "com.myawesome.devicemanager/.receiver.DeviceAdminReceiver", "android.app.extra.PROVISIONING_DEVICE_ADMIN_SIGNATURE_CHECKSUM": "I5YvS0O5hXY46mb01BlRjq4oJJGs2kuUcHvVkAPEXlg", "android.app.extra.PROVISIONING_DEVICE_ADMIN_PACKAGE_DOWNLOAD_LOCATION": "https://play.google.com/managed/downloadManagingApp?identifier=setup", "android.app.extra.PROVISIONING_ADMIN_EXTRAS_BUNDLE": { "com.google.android.apps.work.clouddpc.EXTRA_ENROLLMENT_TOKEN": "{enrollment-token}" } }\ This QR code bundle contains all the information necessary to automatically enroll the device, install required apps, and apply policies such as those specified in the enrollment token.
\n
Android OS\
\ \ To configure this at the Android OS level,
The files below can be set in the OS build directly (or)
We can make the Device Manager App a system app that’s signed using the platform key to configure itself as a Device Manager by writing the XML files mentioned below programmatically,
\n /data/system/deviceowner2.xml
\
\ /data/system/device_policies.xml
\
\
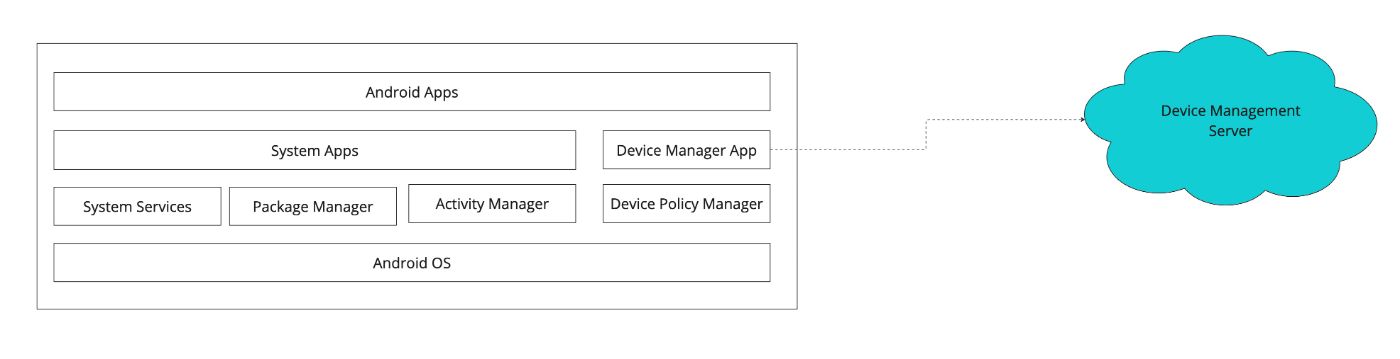
Usage of Device Policy ManagerThe first step is to setup a DeviceAdminReceiver that will be the component for the Device Owner which can be accessed via DevicePolicyManager. The receiver declaration in manifest will also contain the device policies xml in the meta-data.
\
\ Here is the device_policies meta data,
\ We will explore the usage of Device Manager, which we configured for common device management tasks like rebooting, generating bug reports, granting permissions, defining policies, and factory reset/wiping on Android.
\ DevicePolicyManager API reference: https://developer.android.com/reference/android/app/admin/DevicePolicyManager
\n
Rebooting the device import android.app.admin.DevicePolicyManager import android.content.ComponentName import android.content.Context fun rebootDevice(context: Context, adminComponent: ComponentName) { val devicePolicyManager = context.getSystemService(Context.DEVICE_POLICY_SERVICE) as DevicePolicyManager devicePolicyManager.reboot(adminComponent) } Requesting a Bug Report import android.app.admin.DevicePolicyManager import android.content.ComponentName import android.content.Context fun requestBugReport(context: Context, adminComponent: ComponentName) { val devicePolicyManager = context.getSystemService(Context.DEVICE_POLICY_SERVICE) as DevicePolicyManager devicePolicyManager.requestBugreport(adminComponent) }\
Broadcast Receiver to Handle the Bug ReportHere’s how to implement the BugReportReceiver to retrieve the bug report:
\
import android.content.BroadcastReceiver import android.content.Context import android.content.Intent import android.util.Log class BugReportReceiver : BroadcastReceiver() { override fun onReceive(context: Context, intent: Intent) { // Retrieve the file path of the generated bug report zip file if (intent.action == DevicePolicyManager.ACTION_BUGREPORT_SHARE) { val bugReportUri = intent.getData() if (bugReportUri != null) { Log.d("BugReportReceiver", "Bug report saved at: $bugReportUri") // Process the bug report file as needed, e.g., upload to a server or save it locally } } else { Log.e("BugReportReceiver", "Bug report generation failed") } } }\ Here’s the registration in the manifest,
\
\
Grant Run-time permissions to other apps import android.app.admin.DevicePolicyManager import android.content.ComponentName import android.content.Context import android.content.pm.PackageManager import android.os.UserHandle fun grantPermissionToApp(context: Context, adminComponent: ComponentName, packageName: String, permission: String) { val devicePolicyManager = context.getSystemService(Context.DEVICE_POLICY_SERVICE) as DevicePolicyManager devicePolicyManager.setPermissionGrantState(adminComponent, packageName, permission, DevicePolicyManager.PERMISSION_GRANT_STATE_GRANTED) }\ For example, if you want to grant CAMERA permission to an app:
grantPermissionToApp(context, adminComponent, "com.app.cameraapp", android.Manifest.permission.CAMERA)\
Factory Reset / Wipe Device import android.app.admin.DevicePolicyManager import android.content.ComponentName import android.content.Context fun wipeDeviceData(context: Context, adminComponent: ComponentName) { val devicePolicyManager = context.getSystemService(Context.DEVICE_POLICY_SERVICE) as DevicePolicyManager devicePolicyManager.wipeData(DevicePolicyManager.WIPE_EXTERNAL_STORAGE or DevicePolicyManager.WIPE_RESET_PROTECTION_DATA) }\
Defining Device Policies Disable Camera import android.app.admin.DevicePolicyManager import android.content.ComponentName import android.content.Context fun setCameraDisabled(context: Context, adminComponent: ComponentName, disabled: Boolean) { val devicePolicyManager = context.getSystemService(Context.DEVICE_POLICY_SERVICE) as DevicePolicyManager devicePolicyManager.setCameraDisabled(adminComponent, disabled) }\
Enforce Password Quality import android.app.admin.DevicePolicyManager import android.content.ComponentName import android.content.Context fun enforcePasswordQuality(context: Context, adminComponent: ComponentName) { val devicePolicyManager = context.getSystemService(Context.DEVICE_POLICY_SERVICE) as DevicePolicyManager devicePolicyManager.setPasswordQuality(adminComponent, DevicePolicyManager.PASSWORD_QUALITY_NUMERIC) }\
Hiding a PackageHiding an app prevents the user from launching or interacting with it, though the app remains installed on the device.
\
import android.app.admin.DevicePolicyManager import android.content.ComponentName import android.content.Context fun hideAppPackage(context: Context, adminComponent: ComponentName, packageName: String, hide: Boolean) { val devicePolicyManager = context.getSystemService(Context.DEVICE_POLICY_SERVICE) as DevicePolicyManager val success = devicePolicyManager.setApplicationHidden(adminComponent, packageName, hide) if (success) { if (hide) { println("Package $packageName has been hidden.") } else { println("Package $packageName has been unhidden.") } } else { println("Failed to change the visibility of $packageName.") } }\
When to Use HidingKiosk Mode: If you are setting up a device in kiosk mode, you can hide unnecessary apps so that the user can only access the relevant ones.
Temporary Disable: For situations where you temporarily don’t want users to access certain apps, like during exams, maintenance, or restricted times.
Security: In high-security environments, hiding potentially vulnerable apps may prevent malicious users from exploiting them.
\n
\n
ConclusionManaging over 300,000 Android-based payment terminals has been a challenging yet enriching experience. Building the GoDaddy Commerce Terminal Management Solution from the ground up has taught me the importance of scalability, security, and streamlined operations. By leveraging the Android Device Policy Manager, we’ve been able to ensure that these terminals remain secure, updated, and capable of supporting our various payment services in compliance with PCI and EMV standards.
\ Throughout this journey, we’ve encountered and solved numerous device management challenges — provisioning devices at scale, enforcing security policies, configuring devices remotely, and much more. One key takeaway is that creating a robust Terminal Management Solution involves more than just deploying devices; it requires deep insights into the Android OS and application-level management, ensuring that these terminals can handle the rigors of real-world commerce.
\ I hope the tools and techniques outlined in this post will help others in similar roles, whether managing a few hundred or hundreds of thousands of devices. As Android continues to evolve, so too will device management capabilities, and I look forward to seeing what new features emerge to simplify and secure the management of large fleets of devices.
\ In the end, it’s all about making sure that every transaction, every tap, and every payment is seamless, secure, and reliable — no matter how large the scale.